Model settings
In Varicent Incentive Compensation Management (ICM), from the Model settings  menu, you can manage documents, download files, send notifications to web users, and add external tools.
Audit page
From the Audit page, you can monitor all activity by all users in Varicent Incentive Compensation Management (ICM). This page logs any database creation, modification, and deletion activity, and presents those activities in the form of a filter-capable grid for administrator review.
If you need to retrace your steps, the Audit page provides all the key information that you need to determine the exact process that was used to build your model. You can view audit details by clicking on the Audit ID, or by clicking the More options menu (…) and clicking View details. The audit details page shows a list of actions performed and change history.
In addition to monitoring all activity in the client, the Audit page also displays web data edit and Portal Access entries that were made by Sales Portal users. The user types for changes are administrator for the client and web user for Sales Portal.
Audit page functionality
In Varicent Incentive Compensation Management (ICM), you can use the Audit page to review events and actions that were taken by administrators.
You can view the following events in the Audit page:
Adding user roles
Administrator log on and log off
Category calculation changes
Calculation started, stopped, canceled, and completed
Changes to data made in the Varicent add-in for Microsoft Excel (these will appear as a change in Composer)
Changing user role permissions
Column added and removed
Completed Process Lists tasks and subtasks
Connections made between components
Configuration change
Created or deleted tables, Views, or Presenter reports
Data and assignments saved
Data import begun and concluded
Favorites section modifications
Folder created and deleted
Inquiry changes made in the client and Sales Portal
Items scheduled, unscheduled, saved, added, run, renamed, started, and deleted
Migration log on, log off, ended, and began
Modified user information
Modified View tables
New model created
Number of new rows imported into a table
Number of rows updated in a table
Password changed
Payee enabled for web access
Process Lists created, deleted, modified, and reset
Process Lists tasks and subtasks checked and unchecked
Row update submission
Sign off begun
Star schema populated
Started and completed optimization
Tasks deferred or dismissed
Task rules edited or added
Trees and groups created, deleted, edited, and saved
Updates to Presenter reports
Upgrade models
User modified
Users log on, log on failed, and log off
Web data edit
What role the user is when added
Portal Access entries
Migrated object and objects deleted during migration
Filtering Audit page results
In Varicent Incentive Compensation Management (ICM), you can filter results in the Audit page by user type, user ID, module, event type, and date.
From the admin panel, click Model settings
→ Audit.In the header of the column that you want to filter, click the Filter icon.
Select an item or items to filter by.
Click Apply filter.
Tip
You can also use the date fields in the toolbar to display the results for a specified period of time.
Viewing details of table edits
In Varicent Incentive Compensation Management (ICM), you can view details of changes that were made to tables in the Composer module in the Audit page. Only the rows that were edited are displayed.
From the admin panel, click Model settings
→ Audit.Apply filters to display table changes.
For example, filter the Event column by Data Saved.
Click the event that you want to view the details for.
Important
If a data import into a table causes a new payee to be added to the Payee table, the Audit page shows both the update to the data table and the addition of the member to the Payee table.
Select a row to view the change details.
The details of the changes made to the table are displayed.
Exporting Audit page entries
In Varicent Incentive Compensation Management (ICM), you can export the contents of the Audit page to comma-delimited, tab-delimited, or Excel formats. An export is useful for creating an archive of old Audit page contents.
From the admin panel, click Model settings
→ Audit.Click Export
 .
.Select a destination folder for the Audit page, type a file name, and select type of file that you want to save the Audit page as.
Click Save.
Setting Audit page options
In Varicent Incentive Compensation Management (ICM), you can specify that you want an automated entry to be created in the Audit page every time a user logs into or out of the Sales Portal. You can also specify the order in which the events are sorted.
From the admin panel, click Model settings
 → More options.
On the Audit Log tab, you can select the following options:
Option
Description
Track web user log on/off
Select this checkbox to specify that you want an automated entry to be created in the Audit log every time a user logs into or out of the Sales Portal.
Reverse the sort to show newest events first
Select this checkbox to show the newest events first in the Audit log.
Performance page
The Performance page logs your Varicent ICM model’s calculation processes. See details of entire calculation runs and their computation tasks. Use the Calculation batch overview to compare runs and see the difference in duration between calculation runs. Open computation charts to view computation duration, type, incrementality, and status. You can export calculation batch overview data directly to SalesForce or download reports in Microsoft Excel, PDF, or text file format. You can also download computation charts in .CSV format.
To open the Performance page, click Model settings → Performance.
Reading the calculation batch overview
Calculation runs typically involve more than one computation task, so the Performance page identifies them in batches. The duration of runs and tasks is an indication of your model’s calculation performance.
Hover your mouse over the bars in the graph to see calculation ID and duration at-a-glance.
From the bottom of the page, click the dropdown menus to select the number of items per page and select page number. You can click inside of cells in the table to copy their contents.
Note
If your calculation batch overview shows no performance activity, try clearing your filters. Or if your model is completely new, you can run calculations in the Composer module to populate this page with data.
Filtering and sorting calculation runs
In the Performance page, you can filter and sort calculation batches by:
Batch ID
Duration
Start date
Incrementality
Calculation type
Status
You can filter calculation batches by:
A specific calculation batch ID
By a start date range
A specific calculation type
Incrementality
Filter settings are applied in real time with your entries. The Performance page saves your sort and filter settings from one session to the next.
Note
Sort and filter settings are saved separately for users on each web browser.
Applying filters and sorting
To apply filters to the Performance page:
Click on the dropdown menus above the table to sort and filter your calculations.
Use the fields and selectors to enter your choices.
You can also sort the calculation table by clicking on column headers.
When you have filters selected, you can click Clear all to reset filters.
Note
If the calculation table appears empty, try clearing your filters or refreshing the page.
Comparing calculation batches
Varicent ICM lets you compare two calculation batches at a time and view the difference in duration between their respective computation tasks.
In the Calculation batch ID column, select the checkbox of two calculations runs you want to compare, or by clicking on the bars in the Calculation batch overview chart.
Click Compare.
Note
The Compare button is inactive until you select two calculations. You cannot select more than two calculations for comparison.
Comparing calculation runs takes you to the Batch comparison page, an overview and comparison of the selected calculation runs. Each bar in the graph shows a computation task and its run time. Hover your mouse over bars in the graph to see the names of computation tasks with their base and target run times.
Exporting the calculation batch overview
Varicent ICM includes a publishing tool with four output types, allowing users to export their calculation batch overview data to SalesForce, or download reports in Microsoft Excel, PDF, or text file format.
From the admin panel, click Model settings
→ Performance.Click Export.
Select an export format. Click Next.
Give your export file a name and adjust the publication options if necessary.
Provide a publication path to place your publication into a sub folder, or leave the publication path blank to save your file directly in the Downloads Publisher folder.
Note
You can find your saved files in the Publisher tab of your model’s Downloads page.
Viewing computation charts
Clicking on a calculation batch ID takes you to the batch’s Computation Chart, which shows the length of time to run each computation task of the calculation run. The chart shows computation tasks over time for each worker in the system and lists the name, duration, start date, end date, and status of computation tasks.
Hover your cursor over a bar in the chart to view the name and duration of computation tasks. Enter a computation task’s name or ID to see it highlighted in the chart. Click on each computation task to see its place in your model’s organization chart.
Note
The calculation engine runs up to ten computation tasks at a time.
Exporting computation charts
When viewing a calculation batch’s Computation Chart, you can export the data to a .CSV file by clicking Export.
Note
The data included in the .CSV file is slightly different from the Computation Chart. In the .CSV file, each row of data includes time taken for calculation tasks as well as administrative tasks performed in each calculation, such as table clearing. The Computation Chart shows only the duration of calculation tasks, not administrative tasks. So the calculation duration listed for a row of data in the .CSV file may be longer than the calculation duration in the Computation Chart, this is because the Computation Chart does not record administrative processes.
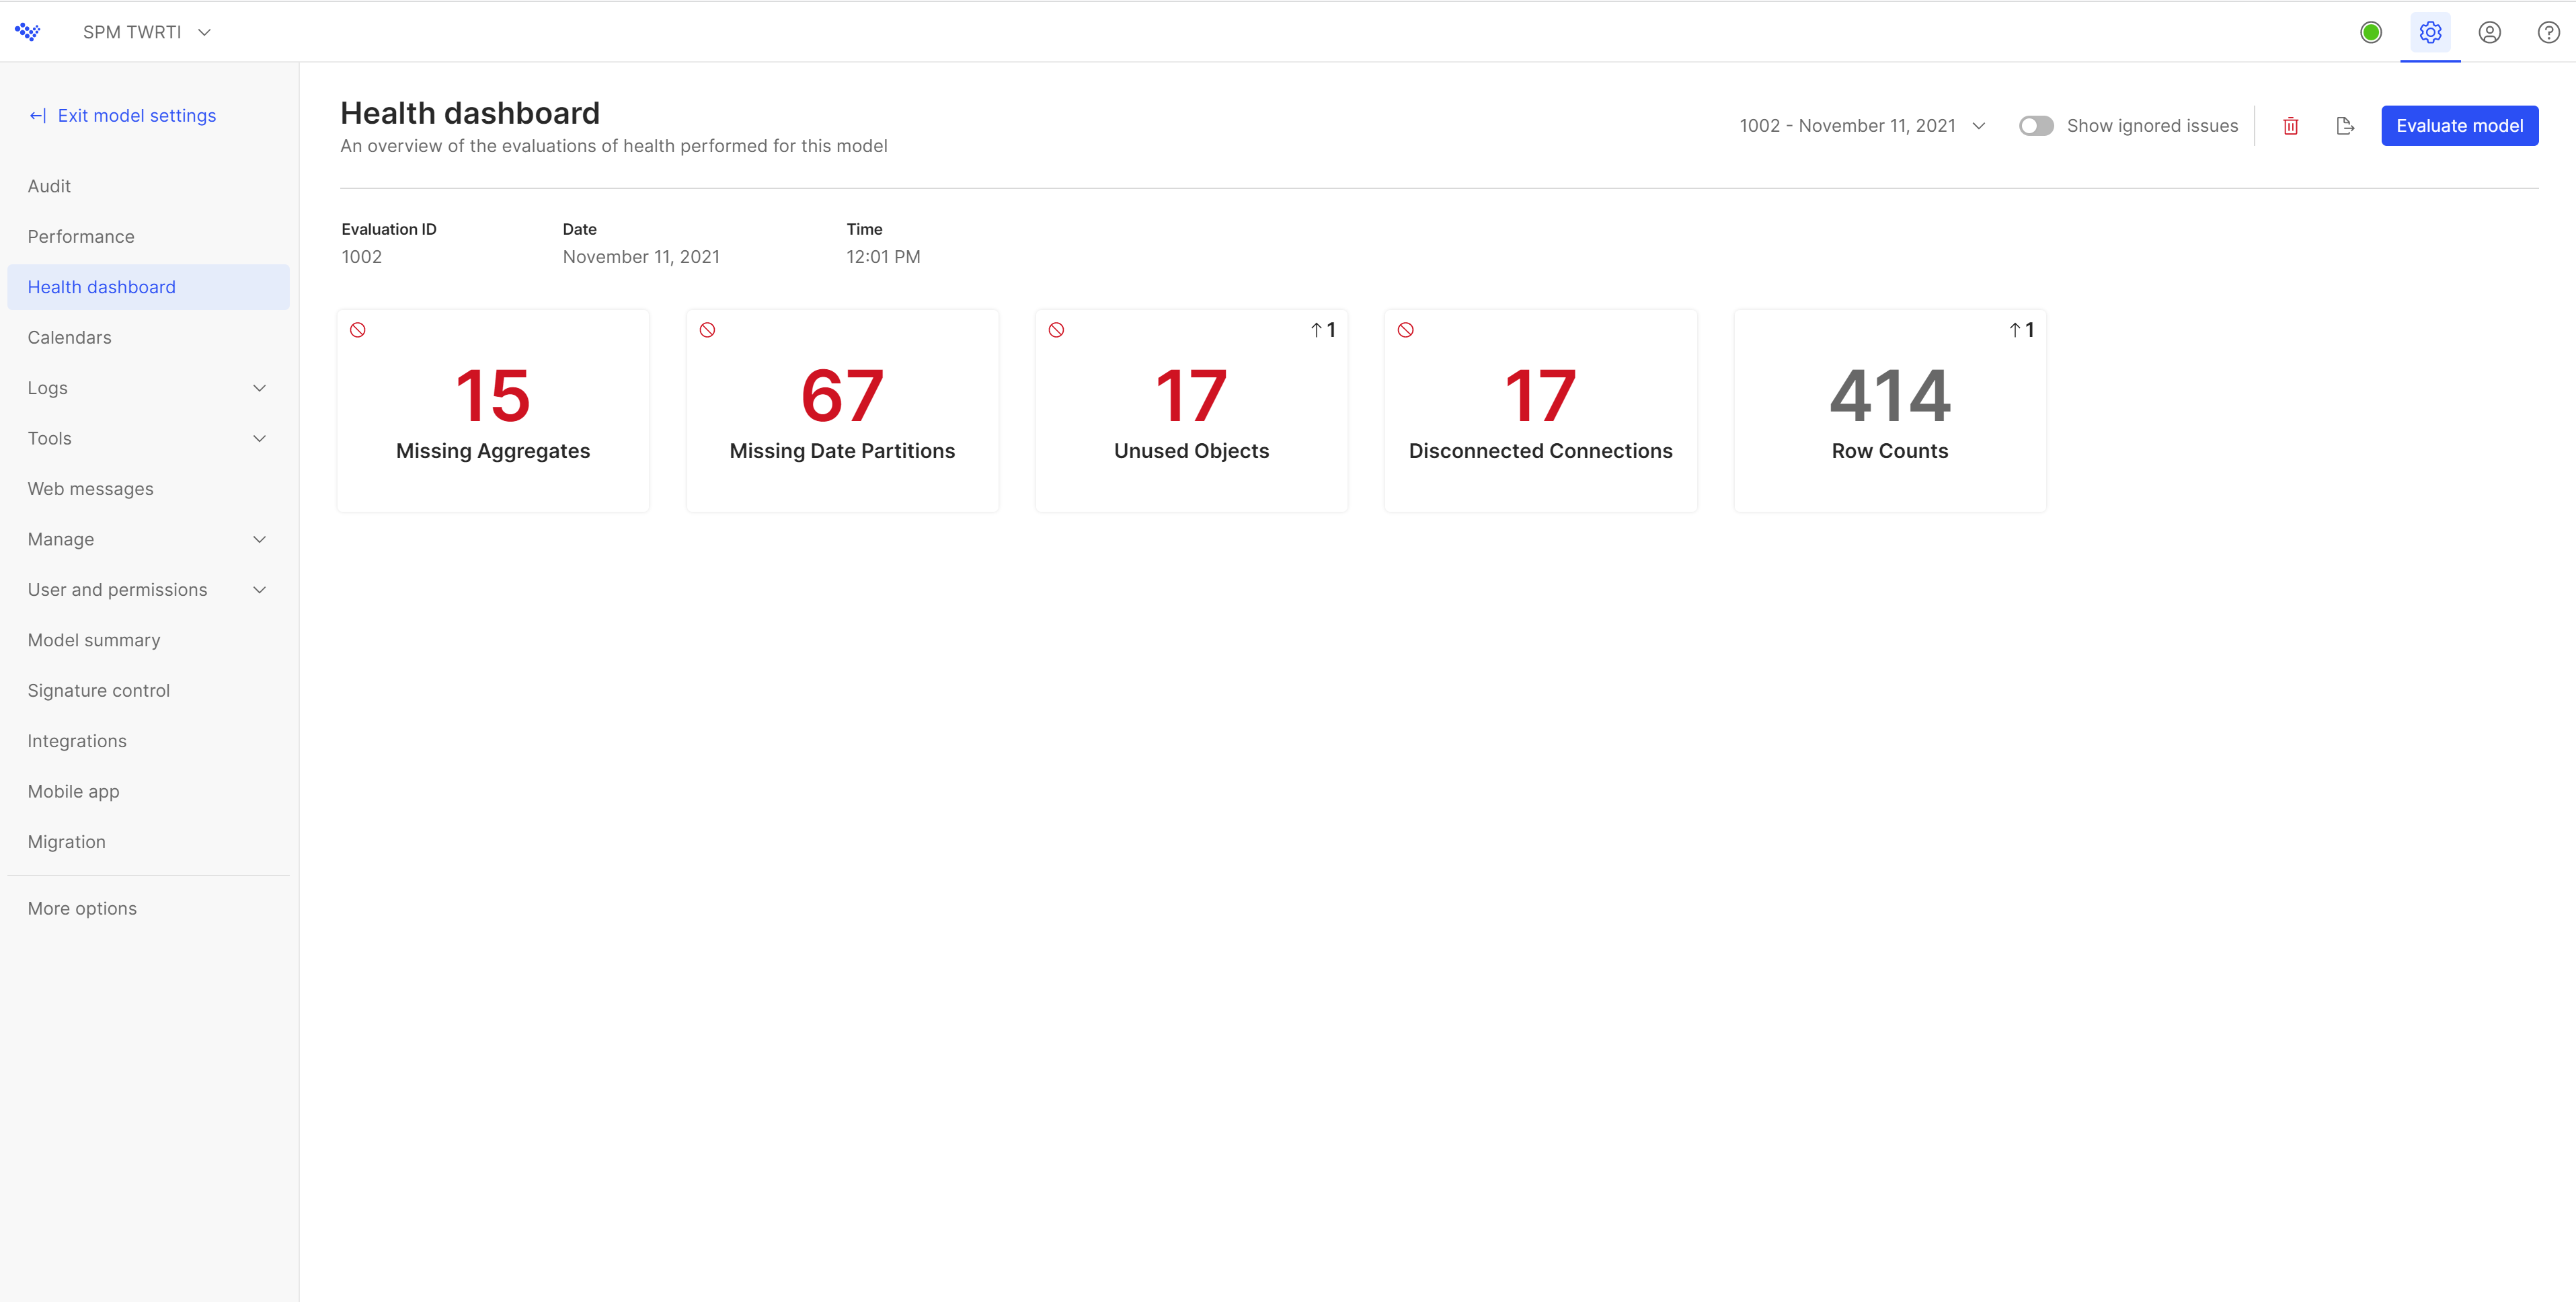
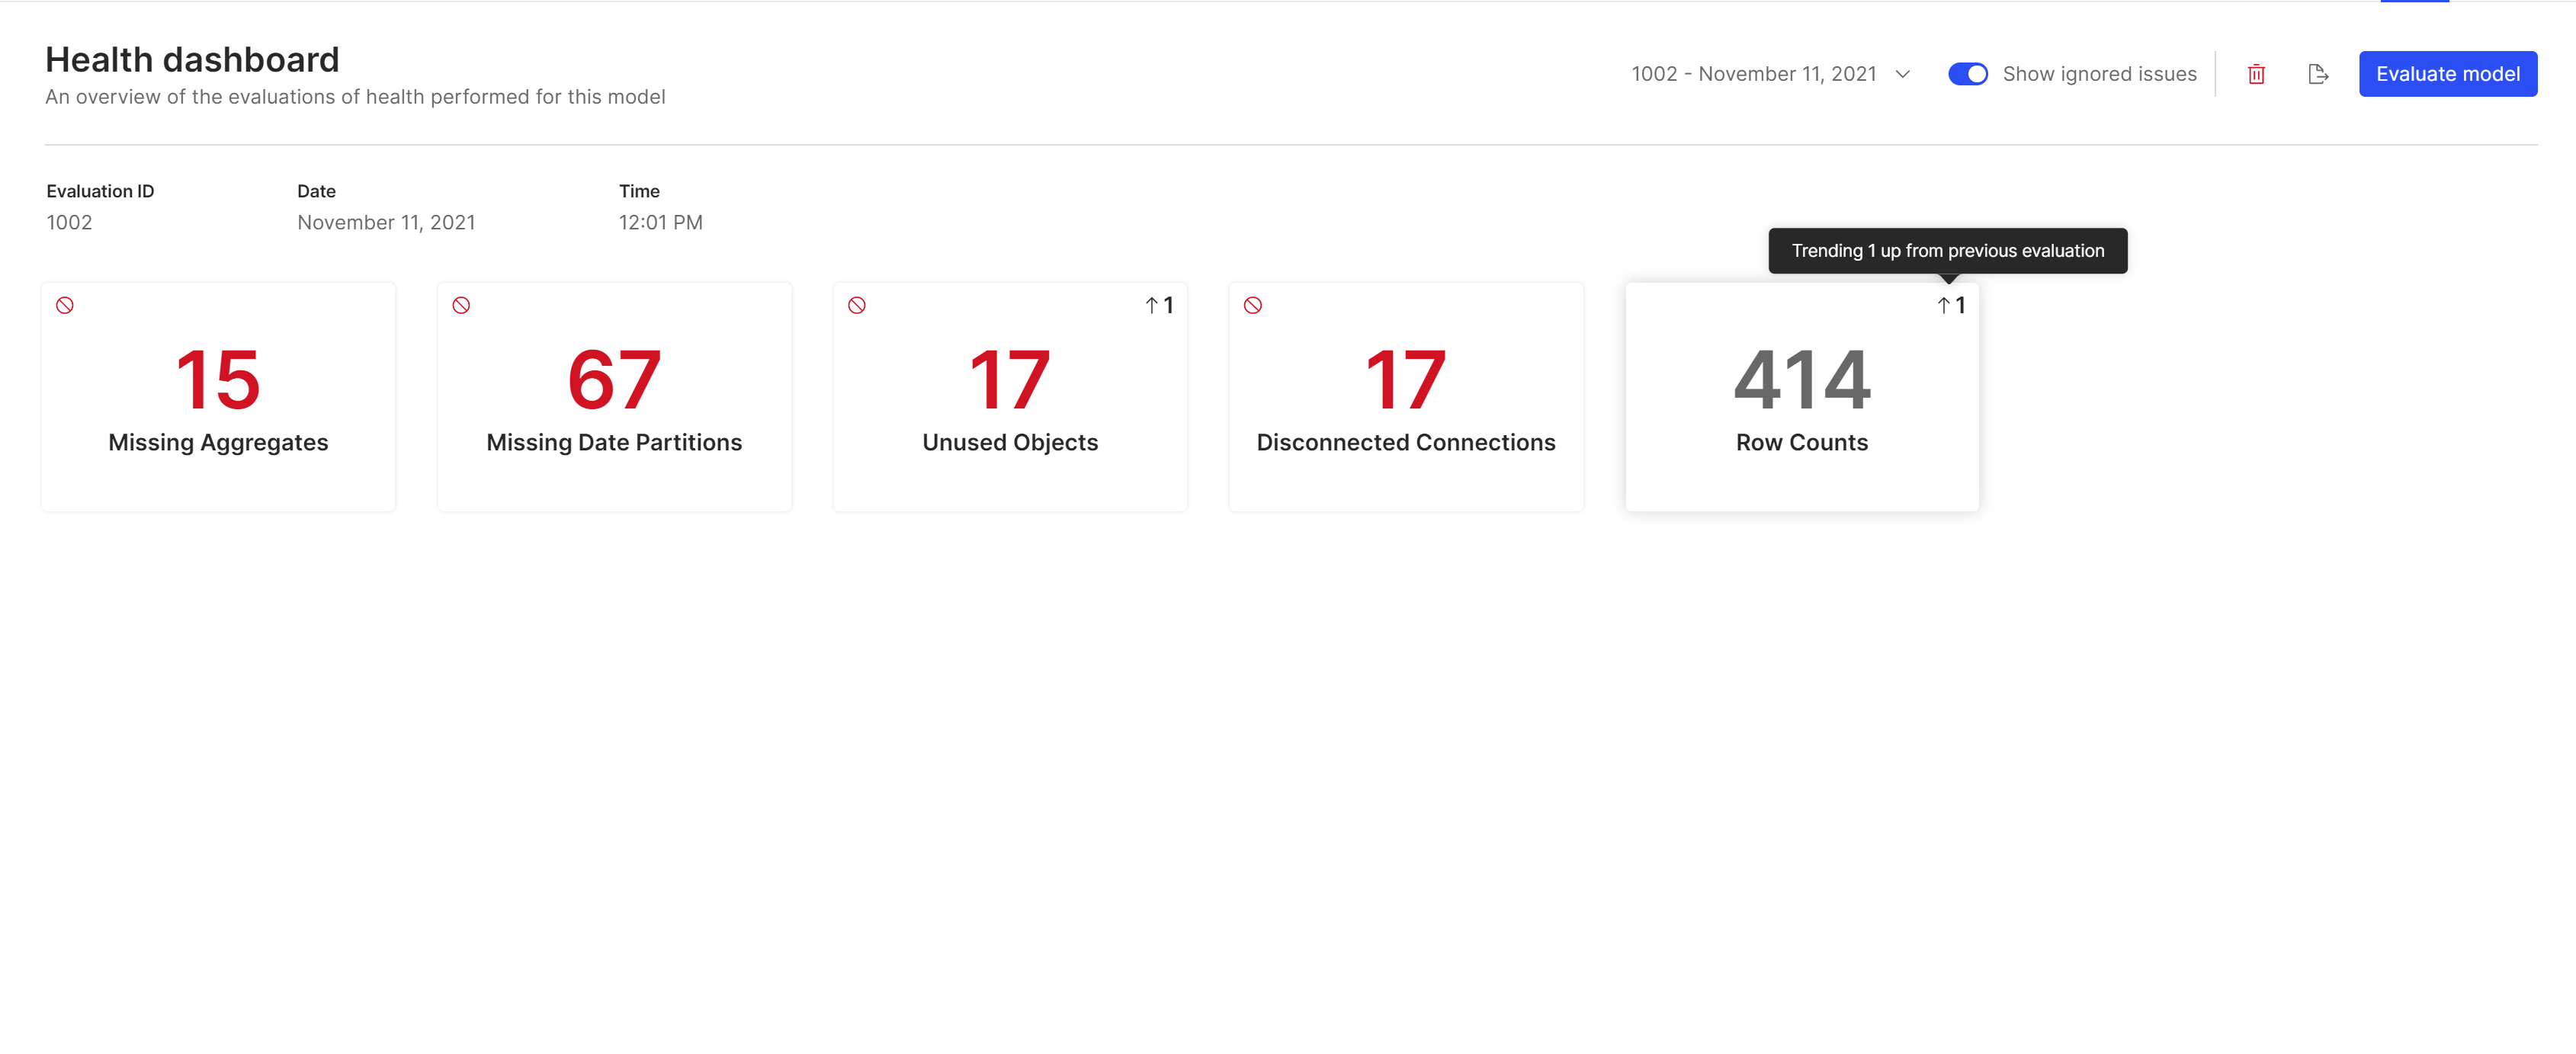
Health Dashboard
The Health Dashboard shows an overview of your model's performance. You can use this to find ways to improve performance.
Running a health evaluation on your model
From the admin panel, click Model settings
→ Health dashboard.Click Evaluate model to run a health evaluation on your model.
A confirmation message appears when the evaluation completes. Click the link in the message or return to the Health Dashboard to see your results.
To view one of your eight most recent evaluations, select the evaluation you want to see from the date menu.
To view all of your past evaluations, click .
If you want to delete an evaluation, select the evaluation you want to delete from the date menu and then click Delete
 .
.To delete an evaluation from the evaluation log, click the more options menu (...) for the row you want to delete and then click Delete
.If you want to export the results of an evaluation, select the evaluation you want to export from the date menu and then click Export
.To export results from the evaluation log, click the more options menu (...) for the row you want to export and then click Export
.
Tip
You can use Scheduler to schedule regular Health Dashboard evaluations.
Interpreting the results
The Health Dashboard shows the results of your evaluation and color-codes the test metrics to help you interpret the results.
Color | Meaning |
|---|---|
Green | No results for that metric. |
Yellow | One to five results for that metric. |
Red | Six or more results for that metric. |
Grey | Row count is always grey, since this metric is informational and doesn't have an impact on performance. |
Click on the metric to see detailed results. You can go directly to some objects by clicking the name in the results table.
You can filter through text columns in the results table:
Hover over the column name.
Click the filter icon
 .
.Type keywords or numbers into the search bar.
Note
If your model is PPO-enabled, you won't see row counts in the metric details.
Missing Aggregates
These are calculations without aggregation in formulas. This can cause inconsistent results. Over time, it can negatively impact model performance.
Tips to resolve: Try adding aggregate functions to these formulas, like
SUM(),COUNT(),MAX(), orMIN().
Missing Date Partitions
These are calculations without a date partition. They can impact performance since they don't benefit from calendar locking. Performance degrades over time as data is added.
Tips to resolve: Try adding a date partition to these calculations. Some calculations may not require a date partition if the data set is refreshed rather than adding new data or the calculation has a defined date range, such as only calculating for the current month.
Unused Objects
These are unused objects. Although they don't have a direct impact on performance, removing them can make it easier to find useful objects when searching. In the case of data stores, removing these can reveal unused calculations, which do have an impact on performance.
Tips to resolve: Remove these objects from your model if they're not needed.
Disconnected Connections
These are unused connections or ports with missing sources. If a calculation uses a disconnected port, it can cause inaccurate results or dropped rows. Although unused connections do not directly impact performance, removing them can make it easier to find useful objects when searching.
Tips to resolve: Try editing the calculation to remove the disconnected port.
Row Counts
This metric shows row counts for tables and calculations. While large tables and calculations aren't a cause for concern, it can be helpful to see the size of these objects at-a-glance.
Reviewing the results
Within the metrics, you have the option to comment on and ignore items in the results table.
To comment on an item:
Click the metric with the item you would like to comment on.
Find the item you would like to comment on.
Click the empty space in the Comment column.
Type the comment into the text box.
Click Submit.
To edit a comment:
Click the Comment icon
 .
.Type the new comment into the text box.
Click Submit.
To delete a comment:
Click the Comment icon
.Delete the text from the text box.
Click Submit.
To ignore items so that they no longer appear in the results table:
Click on the metric you would like to hide items in.
Find the item to hide.
Click the Ignore checkbox.
You can choose to show or hide ignored items by clicking the Show ignored issues toggle in the Health Dashboard toolbar.
Comparing the results
When you run a new evaluation on your model, you can compare the results to the previous evaluation.
If a change has occurred to one of the metrics since the last evaluation, an up or down arrow with a number beside it will appear beside the metric. This arrow will indicate if the change between the current and previous run is trending up or down.
If a change hasn't occurred between evaluations, there will be no visual indicator.
Calendars
In Varicent Incentive Compensation Management (ICM), you can create multiple calendars to address the needs of different lines of business. Calendars are managed through Model settings .
A calendar is created automatically when the model is created or manually by a model administrator.
For example, consider a company that has a sales and a consulting line of business. The sales line of business might define the end of a period as the last day in a month, but the consulting line of business might plan around full weeks, ending their period after the completion of the last full week in any month.
You can manage the different ways each line of business aggregates data through calendars. Each compensation plan uses a single calendar that tells the compensation plan how to aggregate data in time-based calculations. A set of compensation plans for consulting aggregates correctly based on one calendar, and a different set of compensation plans for sales can simultaneously calculate correctly based on a different calendar.
The selected calendar combines date ranges into periods. Date ranges can be created manually for precision, or automatically with the integrated Add Year button in any existing calendar.
Adding calendars
You can add multiple calendars to your Varicent Incentive Compensation Management (ICM) model, including custom calendars.
From the admin panel, click Model settings
→ Calendars.Click + Create.
Type a name for the calendar.
Select the start date.
Select the template format.
Click Add.
Editing calendars
After a calendar is created in Varicent Incentive Compensation Management (ICM), you can edit it.
Any large changes to the calendar are displayed on the Activity tab. You can check the Activity tab to see when long-running calendar changes have been completed.
From the admin panel, click Model settings
→ Calendars.Next to the calendar you want to edit, click the more options menu (...) → Edit.
To add a year in the calendar, complete the following steps:
Select either After Current Year or Before Current Year.
Select the template format.
Click Add.
To edit a period in the calendar, next to the calendar you want to edit, click the more options menu (...) → Edit.
To add a period to the calendar, complete the following steps:
Click the Add Period tab.
Type a name for the period.
Select the end date for the period.
Click Add.
Click Next.
After multiple ranges are defined, they can then be grouped for calculation and reporting purposes. Ranges must be continuous.
To edit the time hierarchy, complete the following steps:
In the Add time rollup field, type a name for a new time roll up.
Select the Create a new top level checkbox to add a new top level to the new time roll up and type a name for the level.
Click Add.
To edit the existing hierarchy, place your cursor over a time rollup and click the Edit icon.
Click Save.
Multiple calendars
You can use multiple calendars in one Varicent Incentive Compensation Management (ICM) model, but use only one calendar (or as few as possible) for payout purposes.
Within a compensation plan, certain calculations might reference different calendars, but the calculation that the payment is based on (final calculation in the plan) must be the same for each compensation plan. This approach simplifies the process of period locking by eliminating the need to lock multiple calendars.
Period locking
Varicent Incentive Compensation Management (ICM) can calculate highly accurate compensation results based on varied information, and then it can lock the calendar.
Before payees and their managers can approve their compensation calculations, you can use Calendar to lock periods to prevent accepted results from changing. Period locking ensures that the amount on each check that is written for each payee corresponds exactly to the values that are shown for that payee and period in the application.
With period locking, the following actions can occur:
Administrators can freeze the calculation and record list for closed, commissioned periods.
The system can protect the results for closed periods and enforce restrictions to ensure that the results are fully auditable and do not change.
How period locking works
When a period is locked for a particular calendar in Varicent ICM, it prevents any values from changing through the lock date.
All associated compensation plans and data tables are locked simultaneously, preventing any calculation results (or source data) from changing. This approach ensures the integrity of prior period results.
When periods are locked, all data tables that are associated with that calendar are locked by the date field (but other table types are not locked). If more than one date field in the table is selected as a primary key, you must select a Lock by Date when the table is created, to specify the field to look at during the locking process.
Before a period is locked, when you calculate all items, Varicent ICM calculates results for all calculations and all periods. After a period is locked, Varicent ICM enforces rules that prevent administrative actions that would invalidate locked calculation results. For example, any new calculations that are created after a period is locked can contain only unlocked periods in the results set. If you want to lock multiple calendars consecutively, you can do so without running another full model calculation as long as no further changes are made in the model.
Locked calculations can, however, be edited. Formulas for locked calculations can be changed, as long as the calculation does not use accumulating partitioning. If the Accumulating Partitions feature is selected, you cannot edit the calculation. Locked calculation results do not change; however, results for any unlocked periods change to reflect any edits that were made to the calculation.
Although it is possible to unlock locked periods, avoid this action. The purpose of period locking is to prevent accepted results from changing and to ensure that payments always match calculated results. If you unlock a period, even to make a minor change, you might inadvertently change accepted payment results beyond the change that you intended to make.
Locking a period
You can lock a period to prevent the results from being edited in Varicent Incentive Compensation Management (ICM).
Perform a calculation before you lock a period to ensure that all calculated results are up-to-date as of the calendar locking.
A calendar lock is considered a change in the model. If you have more than one calendar and another calendar was locked after the last calculation, another calculation is required before you can lock the current calendar.
When you create a data table with more than one date field, you are prompted to select a locked-by date. This is the date that is used when you lock periods.
From the admin panel, click Model pettings
→ Calendars.Next to the calendar that you want to lock, click the more options menu (...) → Lock.
The Time Locking Wizard shows all data tables that are affected by locking the selected calendar.
Click Next.
Select the period that you are locking through.
Tip
You cannot have open periods that exist before a locked period. For example, if you lock period 1 of 2016, all of 2015 is automatically locked as well.
In the Summary pane, verify the action.
Select one of the following options:
Option
Description
Calculate and lock
Select this option to run a full model calculation before the calendar lock.
Lock only
Select this option if you have already run a full model calculation and want to only lock the calendar. If any changes were made since the last calculation, this option is not available.
Click Finish.
The Activity page shows the progress of the calendar locking process. After the process is complete, a message that the calendar is locked is displayed in the Activity page.
If you go back to the Composer module and open a data table, you can see that none of the rows with a date in a locked month can be edited. However, you can still edit rows with dates in an unlocked period.
Unlocking a period
When you unlock periods in Varicent Incentive Compensation Management (ICM), the results for these periods become editable, and potential inconsistencies between payments and results become possible.
Although it's possible to unlock locked periods, avoid this action. The purpose of period locking is to prevent accepted results from changing and to ensure that payments always match calculated results. If you unlock a period, even to make a minor change, you might inadvertently change accepted payment results beyond the change that you intended to make.
Unlocking a period is an irreversible operation. All adjustments for that period are deleted.
From the admin panel, click Model settings
→ Calendars.Next to the calendar that you want to lock, click the more options menu (...) → Lock.
Click Next.
Select a period before the current locked period, or select Unlock all periods.
Verify the action.
Click Finish.
The Activity page shows the progress of the calendar unlocking process. After the process is complete, a message that the calendar is unlocked is displayed in the Activity page.
Adding periods to a locked calendar
You should add periods to a calendar before you lock the final period in your Varicent ICM model. However, you can add new periods to a locked calendar if necessary.
You can add periods to calendars after the periods are locked only if they contain at least three hierarchies. You cannot add hierarchies to a locked calendar.
From the admin panel, click Model settings
→ Calendars.Next to the calendar you want to edit, click the more options menu (...) → Edit.
On the Add Year tab, add a year to the locked calendar.
Important
You can only add n-2 levels, where n is the number of hierarchies that you have. For example, if you have four hierarchies (such as, Total, Years, Quarters, and Months), you can add only two levels (Years and Quarters).
Click the Add Period tab, and complete the following steps:
Type a name for the period (such as 2011, Month 01).
Select a start and end date for the period.
Click Add.
The new period moves to the newest level that you created.
Period locking and system functions
In Varicent Incentive Compensation Management (ICM), system functions can affect period locking, and can be affected by period locking.
The following table lists system functions and how they affect and are affected by period locking.
System functions | Effect of period locking |
|---|---|
Create a calculation | Partition can reference only unlocked periods. |
Change a calculation | Changes are not possible if the calculation includes locked periods. Copied calculations begin in the first unlocked period. |
Calculate | If a calculation is performed on a compensation plan that includes locked periods, the locked periods within the plan are not recalculated. |
Add a member to a payee group | New members can be added to a payee group at any time. |
Modify a calendar | Cannot edit time periods that were locked. |
Add a record to a table in Composer | Prohibited from adding a record that contains a date in a locked period. |
Create a table | Period locking does not affect the creation of a new table. |
Import data | Records containing dates in a locked period are not imported. |
Edit Portal Access permissions | Locked periods do not affect edit Portal Access permissions. |
Change the Portal Access tree | Editing Portal Access trees is still possible with locked periods. |
Enable and disable a table for web edit | Tables can be enabled and disabled for web edit when periods are locked. |
Edit web edit permissions | Editing web edit permissions is still possible when periods are locked. |
Because period locking freezes calculated results for prior periods, running a calculation to update results normally does not calculate data in locked periods. If you mark a large amount of the total system data as inactive, the number of active records included in a recalculation is reduced and, as a result, calculation time speeds up. You might notice that as the number of locked periods in your model increases, your calculation time decreases.
Period locking and calendar changes
Each calendar in Varicent Incentive Compensation Management (ICM) is locked independently so that different companies or divisions can freeze their results at different times.
When you make calendar changes, you can move unlocked periods if the move does not cause a period to go from locked to unlocked or vice versa. After a period is locked, it cannot be moved.
Additionally, any new periods that are added to the calendar must be unlocked, and a locked period can never exist after an unlocked period.
Logs
In Varicent Incentive Compensation Management (ICM), there are several logs that monitor all activity by all users. You can also view lists of errors and Scheduler and task messages.
You can access multiple logs to view a list of errors that were generated, the date and time the error occurred, a description of the error, and the error type.
All logs, except for the Error log, show information specific to the model the user is logged in to. The Error log is user-specific and not model-specific, so it shows information for all models.
The following logs are available:
Import errors log
Export errors log
Scheduler log
Tasks log
External tools log
Viewing the Import errors log
In Varicent Incentive Compensation Management (ICM), if a data import is unsuccessful, you can view details of the error in the Import errors log.
To view the Import errors log:
From the admin panel, click Model settings
→ Logs → Import errors.In the Import errors log, you can:
View the details of each failed import including error ID, the date and time of the failed import, the import name, the table that the import was from, and an overview of the errors.
Note
One-time imports will be blank under the Import Name column.
View a detailed summary of the import error by clicking the error ID, or the more options menu (...) → View details.
You can filter the import errors by:
Clicking the filter icon
 in each column header to change the results to either ascending or descending order.
Clicking the filter icon
 and choosing what to filter the results by.
Clicking the Filter drop-down and setting your filter range.
Viewing the Export errors log
In Varicent Incentive Compensation Management (ICM), if a data export is unsuccessful, you can view details of the error in the Export errors log.
To view the Export errors log:
From the admin panel, click Model settings
→ Logs → Export errors.In the Export errors log, you can:
View the details of each failed export including error ID, the date and time of the failed export, the table that the export was from, and an overview of the errors.
View a detailed summary of the export error by clicking the error ID, or the more options menu (...) → View details.
You can filter the export errors by:
Clicking the filter icon
in column headers to change the results to either ascending or descending order.Clicking the filter icon
and choosing what to filter the results by.Clicking the Filter drop-down and setting your filter range.
Viewing the Scheduler log
The Scheduler log provides details of all Scheduler runs and errors in Varicent ICM.
To view the Scheduler log:
From the admin panel, click Model settings
→ Logs → Scheduler.In the Scheduler log, you can:
View the details of each Scheduler run including run ID, the date and time of the run, and a brief summary of the run.
View a detailed summary of the Scheduler run by clicking the run ID, or the more options menu (...) → View details.
You can filter the entries by:
Clicking the filter icon
in column headers to change the results to either ascending or descending order.Clicking the filter icon
and choosing what to filter the results by.Clicking the Filter drop-down and setting your filter range.
Viewing the Tasks log
The Tasks log provides details of all the tasks performed on your Varicent ICM model.
To view the Tasks log:
From the admin panel, click Model settings
→ Logs → Tasks.In the Tasks log, you can:
View the details of each task including the ID, the date and time of the task, and a brief summary of the task.
View a detailed summary of the task by clicking the ID, or the more options menu (...) → View details.
You can filter the entries by:
Clicking the filter icon
in column headers to change the results to either ascending or descending order.Clicking the filter icon
and choosing what to filter the results by.Clicking the Filter drop-down and setting your filter range.
Viewing the External tools log
The External tools log provides details of all External tools runs and errors.
To view the External tools log:
From the admin panel, click Model settings
→ Logs → External tools.Optional: If you want to sort the results, click the Filter icon beside the name of the column you want to filter by.
Click the number in the Run Number column to view the Console Output.
Tools
In Varicent Incentive Compensation Management (ICM), tools allow you to perform actions such as model optimization, editing calendars, adding payee groups, adding star schemas, and migrations.
Optimizing a model
Using the Optimize model feature optimizes the calculation times in your model, making them shorter for active plans and reports.
Optimization does this by calculating statistics to improve query performance so that data can be accessed more efficiently. Optimize your model after you’ve made changes, a period is locked, or a large data import is done. You can also schedule model optimization as part of a process in the Scheduler module.
Important
More frequent use does not necessarily provide a noticeable improvement in calculation time.
From the admin panel, click Model settings
→ Tools → Optimize model.Click Optimize model.
To cancel a model optimization in progress, follow these steps:
On the Activity page, view the activities in progress.
Hover over the activity you want to cancel and click the Delete icon.
Click Yes to confirm cancellation.
The Activity page opens and displays the progress of the optimization process. After the process is complete, a message that indicates that the model was successfully optimized is displayed.
Payee groups
In Varicent Incentive Compensation Management (ICM), create payee groups to facilitate payee maintenance through Task Manager and define payees in Scenarios workspaces.
Payees are frequently grouped by title. For example, if all salespeople receive five percent commission on everything that they sell, every salesperson can be added simultaneously to a single payee group in the system. It's helpful to consider which payees might be grouped together before you begin the model creation process.
Adding payee groups
In Varicent Incentive Compensation Management (ICM), create payee groups to facilitate payee maintenance through the Tasks module and define payees involved in Scenarios workspaces.
A payee group can contain one or more payee members.
From the admin panel, click Model settings
→ Tools → Payee groups.Click + Create.
Click the Edit icon
 and type a name for the payee group.
Add any tables to the Payee table to use as the source.
On the Restrictions tab, create Restrictions to define exactly which members of the source participate in the group.
For example, to create a payee group that contains only Account Executives, you can define a restriction stating that only payees whose
title ID = Account Executivecan be included.On the Members tab, select the payee group members.
Any members you have already selected through the restrictions window will automatically be shown in the selected payees pane.
Select the start date and end date for the payee group.
Click Save.
Star schemas
In Varicent Incentive Compensation Management (ICM), you can use star schemas to create OLAP cubes for performance analysis.
Star schemas facilitate the export of information to an external analytical software solution. You can create empty fact and dimension tables in the Composer module, and you can schedule imports in the Scheduler module. You can view star schemas and their tables, and you can add or remove a star schema.
The star schema consists of a fact table that references any number of dimension tables. The fact table holds the main data (for example, calculation results), and the dimension tables are joined to describe each value of a dimension. The results of calculations can be analyzed along multiple dimensions. Each dimension table has a single primary key. Fact tables have a compound primary key that consists of the aggregate of relevant dimension keys.
Adding a star schema
You can add a star schema based on a fact table that references dimension tables in Varicent Incentive Compensation Management (ICM).
Star schemas are created with data stores as of version 8.0.4. If you're upgrading a model that contains star schemas that were built with calculations, the star schemas will be deleted. You must re-create the star schemas with data stores instead.
From the admin panel, click Model settings
→ Tools → Star schema.Click + Create.
In the Star Schema name field, type a name for the star schema.
From the Data store drop-down list, select a data store.
Click + Create.
Web messages
Use web messages in Varicent Incentive Compensation Management (ICM) to create, edit, or delete messages for the Sales Portal. Administrators can also notify all Sales Portal users about messages by email.
Adding web messages
You can compose a message that you can then send to all Varicent Incentive Compensation Management (ICM) Sales Portal users.
From the admin panel, click Model settings
→ Web Messages.Click + Create.
Type a subject for the message.
Type a message.
Click + Create.
Sending notifications to all web users
You can send an email to all Varicent Incentive Compensation Management (ICM) Sales Portal users to notify them of new web messages.
From the admin panel, click Model settings
→ Web Messages.Place your cursor over the message that you want to send as a notification to all web users, click the more options menu (...) → Notify.
Click Notify to the confirmation question.
Manage tab
The Manage tab of Varicent Incentive Compensation Management (ICM)'s Model settings page, allows users to manage various items that are available globally across their model. These include things like saved imports, the uploading and management of documents, data grid templates, and history tracking settings.
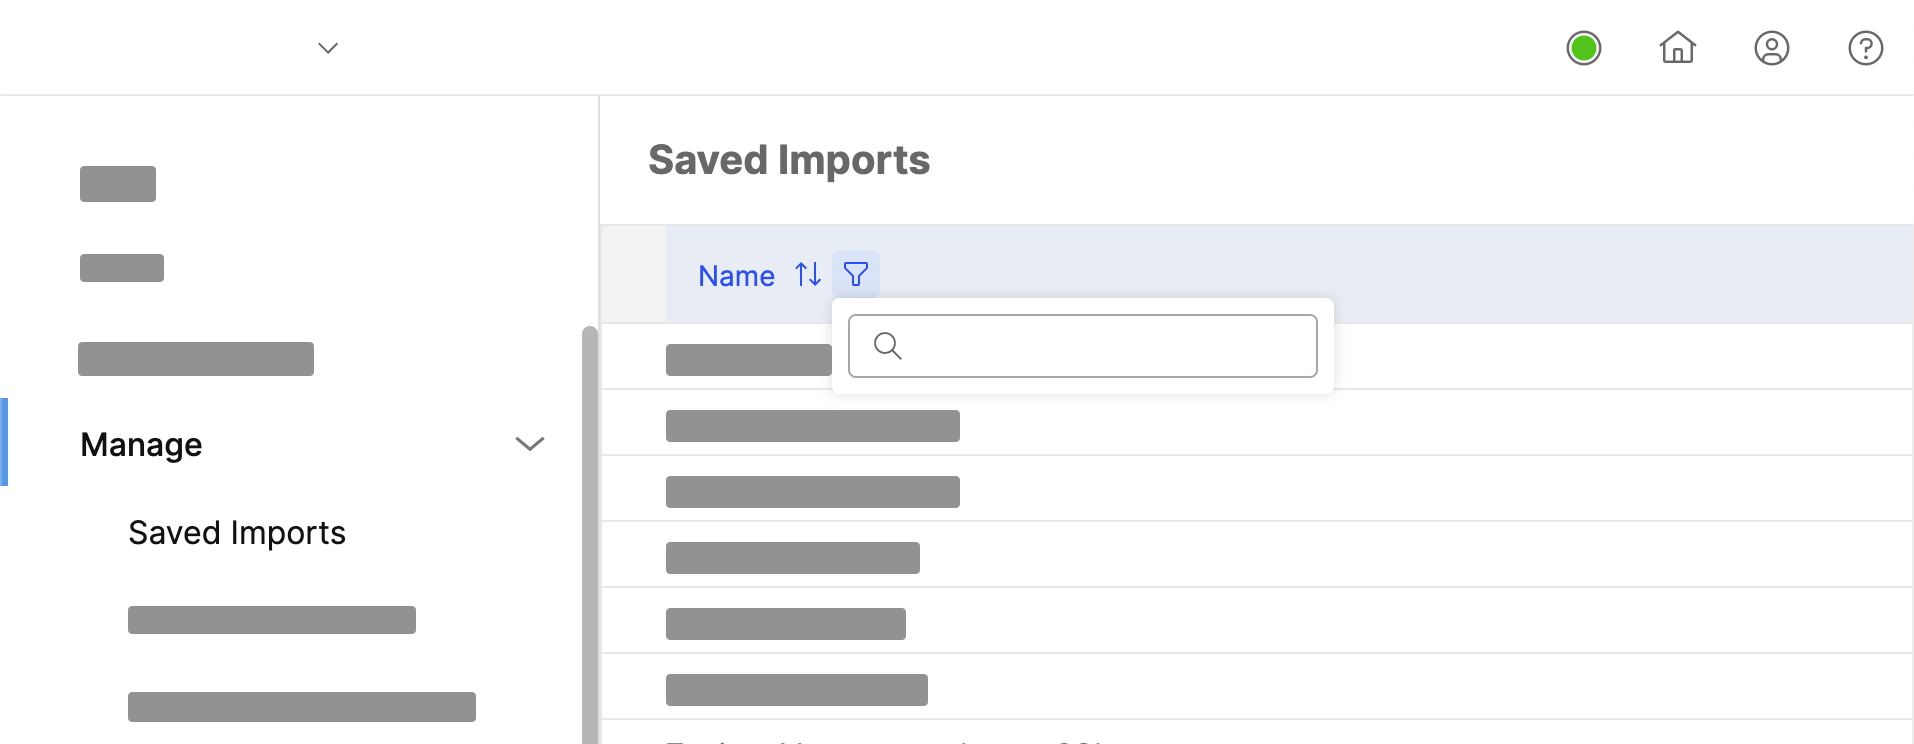
Managing Saved Imports
In Varicent Incentive Compensation Management (ICM), you can delete saved or local imports or edit details of the import. For example, you can edit the name of the import, the data source, the destination table, or column mapping.
From the admin panel, click Model settings
→ Manage → Saved imports.To manage an import, hover over the import and click the more options menu (...).
Click Edit, Delete, or Run.
To filter and search through the imports, hover over the Name row.
Click the filter icon and type the keywords or numbers into the search bar.
Managing Saved Publications
You can view, edit, delete, or run any saved publication from the Manage Saved Publications window in Varicent Incentive Compensation Management (ICM).
From the admin panel, click Model settings
→ Manage → Saved publications.Place your cursor over the publication and click the more options menu (...).
Click Edit, Delete, or Run.
Managing saved transformations
In Varicent Incentive Compensation Management (ICM), you can view, edit, or delete any saved data transformations from the Manage tab. Data transformations are created in the Composer and Data modules, and can be scheduled in the Scheduler module.
From the admin panel, click Model settings
→ Manage → Saved transformations.Select the transformation.
Click Edit or Delete.
Managing files
On the Manage files page, you can add any files that are associated with components, Presenter reports, or are required for review on the Varicent Incentive Compensation Management (ICM) Sales Portal.
To access the Manage files page:
From the admin panel, click Model settings
→ Manage → Manage files.Click + Add.
Select the file you'd like to add.
Click Add.
The file is automatically encoded and saved in Varicent ICM and is available for download at any time.
Any documents that are added on the Manage files page can be enabled for Sales Portal review from the Portal Access module under Assignments.
Managing table history tracking
In Varicent Incentive Compensation Management (ICM), you can choose to track the history of your tables from the History tracking page.
When you add a data, custom, or structural table, a corresponding history table is also added. The purpose of history tables is to track any insertions, updates, and deletions of data into the tables.
Disabling table history collection
By default, changes to tables are logged in Varicent ICM, and history for all tables is recorded. You can choose to disable the collection of history for tables from the admin panel.
From the admin panel, click Model settings
→ Manage → History tracking.Clear the checkboxes next to the tables for which you want to disable history tracking.
Click Save.
Disabling table history collection for all future tables
By default, changes to tables are logged in Varicent ICM, and history for all tables is recorded. Administrators can enable or disable the logging of changes to tables.
From the admin panel, click Model settings
→ Manage → History tracking.To disable the collection of history for all future tables that are created in the Composer module, turn off the Trace history for new tables toggle.
Click Save.
Managing data grid templates
In Varicent Incentive Compensation Management (ICM), templates are used to apply formatting to selected data grids in Presenter reports.
From the Manage tab, you can see an overview of the data grid templates saved on your model.
From the admin panel, click Model settings
→ Manage → Data grid templates.To create a new data grid template, click Create template.
External Tools
You can add tools that exist outside of Varicent Incentive Compensation Management (ICM). An external tool is any program that can be run from the command line.
External tools can then be run through Scheduler Module. For example, if you have a scheduled import or calculation, you can schedule an external tool, such as Notepad, to run immediately after the import or calculation finishes.
Adding External Tools
Any external tools that you want to run through Scheduler must be added to Varicent Incentive Compensation Management (ICM).
From the admin panel, click Model settings
→Manage → External tools.Click + Add.
Select the file you'd like to add.
Click Add.
External Tools and Python Scripts
You can upload Python 3.7 scripts and non-standard Python libraries through the External Tools page in Varicent Incentive Compensation Management (ICM). The scripts can then be run by the Scheduler module.
Tip
Although you can still use Python 2.7 scripts, we recommend using Python 3 scripts since Python 2.7 is no longer officially supported.
Uploading Standard Python Scripts Using the Admin Web Application
Standard Python scripts can be uploaded via the External Tools page in the Varicent Incentive Compensation Management (ICM) admin web application.
From the admin panel, click Model settings
→ Manage → External tools.Click + Add.
Choose the Python script that you want to upload.
Click Add.
The script is added to the /root/Scripts folder.
Uploading Standard Python Scripts Using FTP
Standard Python scripts can be uploaded using FTP for use in the Varicent Incentive Compensation Management (ICM) admin web application.
Log in to your FTP client.
Navigate to the
/root/Scriptsfolder.Add the Python scripts to the folder.
Running Python Scripts From Scheduler
You can run Python scripts that are uploaded to Varicent Incentive Compensation Management (ICM) from the Scheduler module.
Python scripts must first be uploaded through the admin web application or uploaded using FTP to the /root/Scripts folder.
In Scheduler, select an existing process folder that you want to add the new task to, or create a new process folder.
Click the Add icon.
From the Type drop-down list, select External Tool.
Set the time, day, and month that you want the script to run on.
From the Available external tools drop-down list, select the Python script.
In the Arguments field, specify the parameter.
For example, when an external tool runs, the working directory is
/root. If you have ascript.pywhich takes in a file calledconfig.jsonas an argument, and both files have been uploaded to theScriptsfolder, you must specify the full path as/root/Script/config.jsonin the Arguments field.Click Create.
If you want to manually run the task after creation, select the External Tool task and, in the toolbar, click Run. Only one external tool can be run at a time. View the Activities page and Scheduler log to see the results of running the external tool.
Troubleshooting Python Scripts Run
If your Python script fails to run in, you can open the Scheduler log to view the error message. You can also view the External Tools log to view the detailed run status of an External Tool.
If you want to view the Scheduler details, click Model settings
→ Logs → Scheduler error logs.If you want to view the detailed run status, click Model settings
→ Logs → External tools.To view the console output, click the number in the Run Number column.
Python Script Development
When developing Python scripts for use in Varicent Incentive Compensation Management (ICM), there are a few things that you should take into consideration.
For example, if your script needs to connect to a server, such as an SMTP server or an FTP server, or call the Varicent ICM REST API, add a wait time of at least 10 seconds to the beginning of your script. When the external tool runs, it needs some time to connect to the network. You can use the following command in your script:
import time
time.sleep(10)
Packaging Your Python Program
The Varicent Incentive Compensation Management (ICM) external tool only run scripts located at the top level of the Script folder. If you plan to have multiple Python scripts involving multiple files, then you must organize them in the Script folder.
When your Python program has a complex structure with multiple modules, you can zip your script and upload it to Varicent. Python allows running a ZIP file if it contains an entry point __main__.py at the top level of the ZIP file. The following steps use the example of a program packaged as myproject.zip and with the following structure:
myproject
    - __main__.py
    - requirements.txt
    - modules
         - foo.py
where, __main__.py is the entry point of your script.
Zip the contents of
myprojectwithout including the foldermyproject.Note
Inside the ZIP file, a
__main__.pymust exist at the top level.As
__main__.pyis the entry point ofmyproject.zip, run the script locally using the following command:python myproject.zipUpload the ZIP file to the
Scriptfolder.
Using Non-standard Python Scripts
Although Varicent Incentive Compensation Management (ICM) doesn't allow scripts using non-standard Python libraries to be uploaded as an external tool, you can use a different method to run these types of scripts in the application.
Python has a set of standard libraries that can be used. In some cases, you might need to use non-standard libraries, which can be installed using pip.
If you use many non-standard libraries, or need to develop multiple scripts that use different non-standard libraries, you can use virtualenv from the beginning of development to make packaging your requirements easier.
If your script requires non-standard libraries, package each library as a ZIP file.
Tip
Add the requirements to the ZIP file so that, if you have other scripts that use the same requirements, you will only need to upload them once.
Upload each ZIP file to the
/root/Scriptsfolder.Tip
As multiple scripts might use the same library, package each of your non-standard libraries separately. For example, if you have a
requestslibrary and abeautifulsoup4library, create arequests.zipfile and abeautifulsoup4.zipfile. This also gives you more visibility into what libraries you have already uploaded into theScriptsfolder.
Packaging Your Non-standard Python Libraries
Your non-standard Python libraries can be packaged for use in Varicent Incentive Compensation Management (ICM).
If you have been using virtualenv and have been keeping a requirements.txt file, each line of your requirements.txt file is a non-standard library. If you did not use a requirements.txt file to keep track of your requirements, type pip freeze at the command prompt to display the libraries that you currently have installed.
Install each library that your script requires into a new directory by typing the following text at the command prompt:
pip install --install-option="--prefix=/path/to/dir" librarywhere,
path/to/diris the path to the directory where the library is installed andlibraryis the name of your library.The package is installed in the following directory:
/path/to/dir/lib/pythonx.x/site-packagesNavigate to the
site-packagesfolder and zip the contents intolibrary.zip.Note
This is to ensure that the library is at the top level of the
library.zipfile.When Python needs to import a library, it searches for it in the Python path,
sys.path. Because this library is packaged into thelibrary.zipfile, you must change your script so that is also searches for libraries in thelibrary.zipfile. Edit your Python script to include thelibrary.zipfile in thesys.path. This must be done before you import the library into Varicent.If you are running the script directly as
python script.py, include this line:import sys sys.path.insert(0, os.path.join(os.path.dirname(os.path.realpath(__file__)), "library.zip")) #all other imports go below this line
Note
library.zipis in the same directory asscript.pyIf you are running the script as
python myproject.zip, include this line:import sys sys.path.insert(0, os.path.join(os.path.dirname(os.path.dirname (os.path.realpath(__file__))), "library.zip")) #all other imports go below this line
Note
library.zipis in the same directory asmyproject.zip, and__main__.pyis insidemyproject.zip
Test your script to make sure that it works locally.
Tip
To test it properly, make sure that the libraries are not installed locally. Otherwise, when you run the script, it could pick up the local library instead of the script in the
library.zipfolder. To find out if you already havelibraryinstalled in your current environment, run thepip freezecommand. This should not returnlibrary. If it does, uninstall it. Another way to test your script is to create a new virtual environment and activate it. Your environment will be empty at this point.After you have tested your script, upload
library.pyand your script to the/root/Scriptsfolder.Test the script in Scheduler.
Varicent ICM Storage Location
When files are uploaded to Varicent Incentive Compensation Management (ICM), they can be saved in several different locations.
For example, if you have a Python script that modifies an import file that has been uploaded using the Import wizard, then you will need to know the directory in which the import file was saved so you can add the file path to your script.
You can access files that were uploaded to Varicent through the following locations:
/root/Data- contains uploaded import files/root/Script- contains uploaded files through external tool/root/Image- contains uploaded image used in Presenter publish/root/Document- contains uploaded documents
Users and permissions tab
Roles
To protect the integrity of the data in your model, you can define security roles in Varicent Incentive Compensation Management (ICM).
You can create user roles to restrict access to modules in Varicent ICM. For each role that is created, accessible modules are defined.
For example, you might have an administrator who is responsible for setting up and maintaining the Portal Access hierarchy, but is not authorized to edit tables or reports. In this case, you might want to set up a role that has access to the Portal Access module, but cannot access the Composer module. You can then assign the Portal Access administrator role to a user from the Change Roles page.
When an administrator changes a user's password through the Manage Users page, the password history is not saved.
Important
To manage and assign user roles, you must be logged in as an administrator with permission to edit and view administrative options.
Adding roles
You can add a new user role to the list of roles available on your model in Varicent Incentive Compensation Management (ICM).
From the admin panel, click Model settings
→ User and permissions → Manage roles.Click Add new role.
Place your cursor over the new role and click the Edit icon
to name the role.
Define permissions for the role.
Role permissions
After you create a role in Varicent Incentive Compensation Management (ICM), you can grant access to certain items and deny access to others. By default, new roles are denied access to everything.
Access permissions
When a role is given access to a module in Varicent Incentive Compensation Management (ICM), certain access rights or privileges go along with the module or feature.
Module or feature | Privileges |
|---|---|
Activity |
|
Adaptive Forms | Delete
Edit
Submit Data
View
|
Audit page |
|
Calculate |
|
Composer |
|
Composer |
|
Composer |
|
Composer |
|
Composer |
|
Composer |
|
Composer |
|
Data Discovery |
|
Data Store |
|
Health Dashboard |
|
Home page |
|
Home page |
|
Home page | Hierarchies
|
Home page | Impersonate payee
|
Home page |
|
Home page | Manage Documents
|
Home page |
|
Home page |
|
Home page |
|
Home page |
|
Home page | Manage Theme
|
Home page |
|
Home page | Model Summary
|
Home page | Optimize Model
|
Home page |
|
Home page |
|
Home page |
|
Import |
|
Import |
|
Portal Access |
|
Presenter Adaptive | Delete
Edit
View
|
Presenter |
|
Query Tool |
|
Rapid Reports |
|
Scenarios |
|
Scheduler |
|
Tasks |
|
Web forms |
|
Workflow Manager |
|
Import data security
In Varicent Incentive Compensation Management (ICM), you can grant a role permission to import data into tables, view saved import files, and overwrite saved import files.
If users are importing data from an ODBC-compliant database, you can grant permission for advanced settings. Advanced settings allow the role to enter a custom connection string during data import.
Giving roles permission to use advanced settings to import data from an ODBC-compliant database
In Varicent Incentive Compensation Management (ICM), you can grant a role permission to use advanced import settings in the Composer module.
The role must have View and Edit permissions for the Composer module.
To import data into a table in a component, the role must have View and Edit permissions for the component.
From admin panel, click Model settings
→ User and permissions → Manage roles.Expand Import.
Select the Advanced checkbox.
Select the Data checkbox.
Expand Composer → Table.
Expand the table that you want to allow the role import data to.
Expand Structure.
Select the Edit checkbox.
If the table is in the top level of Composer, select the TopComponent.
Click Save.
Administration security
In Varicent Incentive Compensation Management (ICM), you can grant a role permission to set administrative options, run and edit saved imports, run and edit saved publications, and edit saved transformations.
By default, all administrator users can see the Home page, including the information in the admin panel. Additionally, all administrators can create web messages, manage documents, change their password, and view and export the Model Summary from the admin panel. All other rights must be granted to a user's role to allow the user to be able to act upon items.
Managing payee types
Manage Payee Types is a reporting tool that you can use to track the number of payees in a category.
By default, all payees from the Payee table appear in the Unmapped Payees column. You can move payees into a column by dragging and dropping, or bulk-move payees by using the Move Payees option.
Note
Moving payees doesn't change the Payee table.
From the admin panel, click Model settings
→ User and permissions → Manage payee types.Click Move Payees.
In the Type Selection tab, select the columns that you want to move payees to and from.
In the Data Sources tab, add any additional sources.
In the Restrictions tab, define any restrictions.
Click Preview to see which payees move as a result of the restriction.
After you apply restrictions, the Payee tab shows which payees will move to a new column. You can also manually select and clear payees on this tab.
Click Finish.
Publishing a users and permissions report
You can export a list of users, their roles, and their access permissions in Varicent Incentive Compensation Management (ICM).
From the admin panel, click Model settings
→ User and permissions → Change roles.Click Export
 .
.Choose a destination file, type a file name, and click Save.
Model Summary Tab
Model summaries in Varicent Incentive Compensation Management (ICM) provide users with a basic overview of the selected model's statistics.
These statistics include the size of the model, the total number of calculations, tables, the number of users, and payees, as well as the number of calculations that exceed 20 minutes.
In order to view the model size:
From the admin panel, click Model settings
→ Model summary.The Model Size is located at the bottom of the Model Summary table.
When viewing the model size, if it's less than 10 GB, it's displayed in green; if it's between 10 GB and 99 GB, it's displayed in orange; if it's greater than 99 GB, it's displayed in red.
Signature Control page
The Signature Control page in Varicent Incentive Compensation Management (ICM) indicates whether payees accepted or declined agreements in reports.
You can view the following information in the Signature Control page:
Web report name
Date
Signature name
Payee ID
Payee name
Status (accepted or declined)
Viewing the Signature Control page
In Varicent Incentive Compensation Management (ICM), you can view the status of agreements in the form of signature controls added to Presenter reports.
From the admin panel, click Model settings
→ Signature control.Use the search, sort, and filter options to find results in the table:
Click the search icon
 and then enter text in the search field to search for a specific result.
Click the drop-down button next to the sort icon
, select a field, and then select Ascending or Descending to sort results.Click the Filters drop-down button, and then enter filter criteria in the fields to filter the results.
Optional: Click
Export to export the Signature Control page entries to an Excel spreadsheet.
Clearing the Signature Control page
You can clear the entries in the Signature Control to remove any old or unwanted entries.
From the admin panel, click Model settings
→ Signature control.Click
 Clear log.
Select a date.
Note
Signature Control page entries are cleared up to and including your selected date.
Click Clear.
Migration
If there are no conflicts, you can migrate Varicent Incentive Compensation Management (ICM) model objects, along with dependent objects, between models of the same version number.
During migration, you can select any of these objects:
Composer
Forms
Individual components
Process lists
Saved imports
Portal Access trees
Roles
Users
Workflow Manager workflows
Web tabs
Web form filters
Calendars
Presenter Adaptive reports
Migration between models is done by pulling the data from the source model to your current working model (target model).
The migration process migrates only the selected items, so you must use remapping to resolve dependencies. During migration, you can remap items that are used outside of a component to matching local items. If there is no matching local item, migration cannot proceed. You can choose to migrate all dependencies instead.
Tip
Individual tables, reports, and calculations cannot be selected during migration. To migrate an individual model object, wrap the item into a component and migrate the component.
General practice and rules for migration
In general, migration conflicts are determined and managed based on the name of an object in Varicent Incentive Compensation Management (ICM). If an object in the source model has the same name as an object in the target model, the object exists in both models, regardless of the object's composition.
The following list describes general practices and rules for migration:
If an object from the source model doesn't exist in the target model, it's created in the target model during migration.
If an object with the same name exists in both models, and there are no conflicts, it can be migrated.
If the target model has an item with the same name as an item in the source model and you choose to replace conflicts, the target model item is overwritten by the source model item during migration.
If an item exists in the target model, but doesn't exist in the source model, it's deleted during migration. For example, if you're migrating a component that exists in both the target model and source model, any objects inside the target model component that don't exist in the source model component are deleted.
Performing a migration
In Varicent Incentive Compensation Management (ICM), you can select objects from a source model to move to a destination model.
To perform a migration, you must have admin (all) access in the source model and Migrations > Edit and Migrations > Execute permission in the destination model.
From the admin panel, click Model settings
→ Migration.Click Start migration.
Select your source model.
Click Connect.
A list of available objects that can be migrated or pulled into your current model is displayed.
Select the objects to migrate.
You can click Select dependencies to automatically select all items in the source model that an object depends on. This step ensures that all dependent objects are migrated. If this option is not selected, you must use remapping to resolve dependencies. During migration, you are prompted to remap items that are used outside of a component to matching local items. If there is no matching, local item, migration cannot proceed.
You can select the Replace Conflicts checkbox to overwrite objects with the same name in the destination model with those from the source model.
If this option is not selected, overwriting does not take place and migration cannot proceed if there are conflicts. For example, if two calculations have the same name but their formulas are different, or if they have different sources, the Replace Conflicts feature replaces the calculations in the destination model with the calculations in the source model.
Click Migrate.
The next series of windows display migration statuses for all components of the selected objects.
Table 8. Migration wizard screensMigration Status
Meaning
New
The object does not exist in the destination model. The new object is migrated from the source model to the destination model.
Exists
The object exists in the destination model. There are no conflicts that prevent migration.
Conflicted
The object exists in the destination model and there are conflicts. Conflicts must be resolved before the migration can take place. If a calculation is listed as conflicted because the calculation in the destination model is locked and has a different start date than the calculation in the source model, you can choose to ignore the conflict and proceed with the migration.
Overwriting
The object exists in the destination model and is different from the source model. The migration process replaces the object in the destination model with the changed object in the source model. Overwriting occurs only if the Replace Conflicts option is selected.
Deleting
The object exists in the destination model but not in the source model and is removed during migration.
Needs Review
This status is used for process lists only. The process list contains links to objects that do not exist in the destination model. You can remap those links by double-clicking the process list name or finish the migration with invalid links.
For an object to be eligible for migration, none of its objects can be labeled as Conflicted. If there is a conflict, click the warning sign next to the item to view its cause and resolve it before migration can continue.
For process list migration, if the status is labeled as Needs Review, click
 next to the name of the process list to remap links. On the remapping screen, links to objects that exist in the source model but not in the destination model are displayed on the right. From the Choose task links drop-down list, select the task that you want to remap to the source task on the right. From the Choose link actions drop-down list, select the task action that you want to remap to the source task on the right. To remap, drag the item that you want to link to from the left column to the Tasks list.
Click Finish to perform the migration.
Filtering and sorting columns in the migration wizard
In Varicent Incentive Compensation Management (ICM), you can filter and sort the columns in each step of the migration.
You can sort the items in each window of the migration alphabetically in ascending or descending order. You can filter the Status column to find all the New, Conflicted, or Overwriting items easily.
From the admin panel, click Model settings
→ Migration.Click Start migration.
Select the source model.
Click Connect.
Select the objects to migrate.
Click Migrate.
Click the header of the Name column to sort the items alphabetically.
In the header of the Status column, click Filter and select the status by which you want to filter.
Migrating individual Composer objects
In Varicent Incentive Compensation Management (ICM), you can move specific objects, such as Presenter reports, calculations, and tables in Composer, from one model to another.
In the source model, select the Presenter report, calculation, or table that you want to migrate to the target model, and click the Wrap icon.
Important
Web forms cannot be wrapped without also wrapping their sources.
Name the component and click OK.
In the target model, from the admin panel, click Model settings
→ Migration.Click Start migration.
Select the source model and click Connect.
Expand Composer.
Select the component that contains the object that you want to migrate.
Select the Replace Conflicts checkbox.
Click Migrate.
Migration methodology and approach
Plan migrations properly in Varicent Incentive Compensation Management (ICM) to reduce the risk of failed or incomplete migrations. After migrations are complete, validate to ensure that the migration was successful.
Don't assume that a migration is successful without testing and verifying.
You must follow several main steps for each phase of the migration:
Plan
Determine migration requirements.
Identify migration environments.
Create a migration plan.
Create migration procedures.
Create a migration schedule.
Create a Migration log.
Develop a test plan.
Migrate
Communicate the migration and deployment plan.
Customize migration procedures.
Run a pre-validation test.
Back up both source and target models.
Perform the migration.
Validate
Verify the migration completion with the Migration log.
Run a post-migration test.
Communicate project information.
Conduct a migration closeout meeting.
Perform knowledge transfer.
Planning phase
You must follow certain steps to plan a migration in Varicent Incentive Compensation Management (ICM).
At a high level, the following steps describe how to plan a migration:
Determine migration requirements.
Identify migration environments.
Create migration plan.
Create migration procedures.
Create a migration schedule.
Create Migration log.
Develop test plan.
The amount of planning depends on the size and scope of the migration. The planning process generally involves determining the requirements of the migration, identifying the source and target environment, and documenting the migration plan. During the planning stage, a determination of the migration requirements includes identifying the environments that are involved in the migration. If there are more than two environments, there must be a determination of which environments act as sources to the other environments and in which order the migration must occur. The user who has the correct role and privileges to run the migration between the environments also must be identified.
The migration procedure details the steps to take to accomplish the migration. This procedure involves taking screen captures of the Migration wizard and listing which items to select and in which order. The migration procedure must also include any manual steps that are needed to complete the migration. Some items cannot be migrated by using the migration tool. List out these items to make sure that they are accounted for in your deployment plan, with specific manual steps to replicate them in the source system.
Migration planning can also help define which items to migrate first, whether it is necessary to take applications offline, and which internal and external audiences must be informed regarding the migration. Proper migration planning involves more than just the information technology (IT) staff. The business owners of the applications must also be included, particularly because the IT organization determines how important a particular application or set of data is to the business.
In planning a migration, it's important to understand migration requirements such as source and target environments, time schedule, users who are involved, and the configuration of the software. In looking at the time schedule, the IT organization must create estimates for planning, setup time, migration time, and production cutover. Planning typically accounts for 25 percent of the total schedule.
Action item | Assigned to | Status | Date |
|---|---|---|---|
Establish a migration management team. | |||
Gather availability and production schedules. | |||
Document change control procedures so that they can be incorporated into the migration procedures and plans. | |||
Document the timeline for activities for both hardware changes and data migration. | |||
Announce the migration at least 30 days before the intended target migration date. | |||
Create a technical migration team. | |||
Inform the security and compliance groups about the migration. | |||
Schedule a pre-migration rehearsal that includes all the members of the migration team and a data sampling that helps the application groups to conduct the pre-migration and post-migration verification process. | |||
Follow the required change control process. | |||
Establish a migration status call-in process. | |||
Use a migration planning checklist to ensure that all the pre-migration planning steps are completed. |
The following schedule is an example for a simple data migration:
Planning: two days
Setup: two hours
Migration: two hours and 30 minutes for one server
Production cut over: minimal, performed in offline mode
Migration team on site: eight hours
Post-migration validation: two hours
A Migration log identifies objects that must be migrated to the target system and that were tested during and after development by using standard development life cycles and methodology. For example, if you are developing 10 new plans and five new reports for a new fiscal year, you must have a log that identifies those 15 new objects, their names, if they were fully tested, when they passed testing, and who created or tested those objects. This list is used as a checklist for post-migration validation.
Item to be migrated | Assigned to | Status | Date |
|---|---|---|---|
Component: Quarterly Sales Bonus | Ready to Migrate | ||
Component: Annual MBO Bonus | Ready to Migrate | ||
Report: Finance Accruals | Ready to Migrate | ||
Saved Imports: Payee Promotion History | Ready to Migrate | ||
Web Form: Revenue Split Approval | Ready to Migrate |
You must develop a test plan to validate that all migrated objects are integrated properly into the new target environment and that they work. This test plan is similar to a system integration test (SIT), but at a more granular level for each item that is migrated.
Migration phase
Follow certain steps to perform a migration in Varicent Incentive Compensation Management (ICM).
At a high level, the following steps describe how to perform a migration:
Communicate the migration and deployment plan.
Customize any migration procedures.
Run pre-validation test.
Back up both source and target models.
Perform the migration.
During the migration phase, the migration team must communicate its plans; review and customize migration procedures, such as manual steps that are or are not required because of migration limitations; back up all source and target systems; and perform the actual migration. Run a pre-migration validation test and a post-migration validation test. These tests confirm that the objects that are being migrated are in the same state after the migration as they were before.
The most important part of this stage is the migration itself. In addition to using the migration tool, follow the deployment plan step-by-step to ensure a successful migration. The migration tool automates migration of most objects within the model, but the key steps to emphasize in the deployment plan are the items that are not automatically migrated by the tool. These items must be replicated manually in the target model.
If this is not the first time that you are migrating from one environment to another, some of these manual items might have been migrated in the past and might not have changed, or are not items that are identified in the Migration log to be migrated. This is where customization of the migration procedure in the deployment plan is necessary. You must identify what items to remove or add to account for objects that cannot be migrated.
Validation phase
Follow certain steps to validate a migration in Varicent Incentive Compensation Management (ICM).
At a high level, the following steps describe how to validate a migration:
Verify migration completion with the Migration log.
Run a post-migration test.
Communicate project information.
Conduct a migration closeout meeting.
Perform knowledge transfer.
The items that are being migrated from the source systems must be tested before you plan a migration. Also, a test plan must be in place post-migration that involves validating that the items from the Migration log were migrated and that each one is integrated properly into the new environment.
Testing is especially critical in production environments where poorly tested migrations might cause trouble for users. When you migrate to a UAT environment that is mirrored with a production environment, you can do proper testing and catch any processes from the migration plan that were missed.
After the migration is complete, the team should compile migration statistics and prepare a report to highlight what worked, what did not work, and lessons learned. The report should be shared with all members of the migration team. These types of reports are critical in building a repeatable and consistent process through continuous process improvement-building on what worked and fixing or changing what did not work. Further, documenting the migration process can help train staff and simplify or streamline the next migration, reducing both expense and risk.
More Options Tab
Changing the import escape character
In Varicent Incentive Compensation Management (ICM), update the import escape character for import files that contain a delimiter before running imports
The following import escape characters are available: (/\*"^'). For example, if you choose a quotation mark as the import escape character, Payee, Date, Value from a comma delimited file would import as "First Name, Last Name", 1/1/2009, 50.
Important
By default, the import escape character is a quotation mark. This setting is a global setting for all imports. Make sure that your data does not contain the import escape character that you specify; otherwise, your import will fail.
From the admin panel, click Model settings
→ More options.On the General tab, in the Import Escape Character field, type the import escape character in your files.
Click Save.
Defining the export tagline
You can define the tag line text that is displayed on a Excel spreadsheet when the Send to Microsoft Excel option is used in Varicent Incentive Compensation Management (ICM).
From the admin panel, click Model settings
→ More options.On the General tab, in the Export Tagline field, type the text that you want displayed as the tag line.
Click Save.
Clearing Salesforce credentials
You can clear Salesforce credentials stored in a model.
Scheduled tasks that publish to or import from Salesforce will fail after you clear credentials until you add them again.
From the admin panel, click Model settings
→ More options.Click the Privacy tab.
Click Clear.
Disabling automatic joins in calculations
In Varicent Incentive Compensation Management (ICM), you can prevent joins between sources from occurring automatically.
When this feature is disabled, when you join sources, columns with the same name and of the same type are not joined automatically.
From the admin panel, click Model settings
→ More options.On the Calculation tab, clear the Enable auto join in Calculation Wizard checkbox.
Setting web user login security options
You can set security for the Varicent Incentive Compensation Management (ICM) Sales Portal.
The following password rules for web users are not configurable:
Passwords must have a minimum of eight characters
Passwords must contain at least three of the following character groups: letter, number, punctuation, special characters
The following password policies can be configured using the steps below:
Password expiration
Password history limit
Password failure attempts
From the admin panel, click Model settings
→ More options.On the Web tab, you can select the following options:
Option
Description
Enable Web
Clear this checkbox to temporarily disable the Sales Portal while the model is being updated and prevent web users from logging in.
Enable self-service password reset
Select this checkbox to let users reset a forgotten password through a link on the Sales Portal.
Web server email settings must be configured before you can use this feature. After you select this feature, you must specify the length of time (in seconds) that web users must reset their password before it expires.
Lockout user after
Select the checkbox to indicate how many attempts web users have to log in to the Sales Portal before their accounts are disabled. After an account is disabled, an administrator with permission to edit users must enable the account again. Additionally, web users can unlock their accounts by using the password reset feature.
Password expires after
To force web users to change their passwords after a particular number of days, select this checkbox and type the number of days after which you want the password to expire.
Keep password history for
Select this checkbox to indicate how many times users must create a different password before they can reuse a previous password.
Click Save.
Setting email address for request assistance link on the web client
You can configure the email address that is used when a user clicks the following links in the Varicent Incentive Compensation Management (ICM) Sales Portal: Request Assistance, Forgot your user name and password, and Don't have an account.
If the email address is not configured, then Request Assistance is not displayed on the Sales Portal.
From the admin panel, click Model settings
→ More options.Click the Web tab.
In the Help Email field, type the email address of the user whom you want to notify when a web user requests assistance on the Sales Portal.
Click Save.
Setting the base URL for the web client
In Varicent Incentive Compensation Management (ICM), to ensure that the Report Name With Link variable in Workflow Manager functions correctly in a message by an Alert node to the Sales Portal, the base URL for the Sales Portal must be configured.
From the admin panel, click Model settings
→ More options.Click the Web tab.
In the Base URL field, type the URL of your
WARfile.For example, type the following address:
http://localhost:8080/Varicent ICM, whereVaricent ICMis the name of yourWARfile.Click Save.
Forcing web users to change passwords on first login
You can enable an option that forces users to change their passwords the first time they log in to the Varicent Incentive Compensation Management (ICM) Sales Portal.
The forced password reset applies to new web users who are logging in for the first time and re-enabled web users who are logging in for the first time after they were re-enabled through Portal Access.
Important
This option is available only for users who are enabled for web through Portal Access and who do not use SAML 2.0 integration.
From the admin panel, click Model settings
→ More options.Click the Web tab.
Select the User must change the password the first time he or she logs in checkbox.
Web users must enter a password into the New Password field the first time they log in.
Switching from Portal Access-managed inquiries to Workflow inquiries
If you’re currently using Portal Access to manage inquiries, you can upgrade to our new Inquiry Workflows experience. Our Support team can enable workflow inquiries for you. In your request, include which models you want the feature to be enabled on. Once you opt in to the new workflows experience, you cannot switch back.
Enabling workflow inquiries removes the tab in Portal Access and gives you access to the Inquiry Management module. Sales Portal users will not be able to see old inquiries in the Message Center. You can, however, make archived inquiries visible, but users cannot interact with archived inquiries.
To show archived inquiries:
From the admin panel, click Settings
→ More options → Portal access.Select the Show archived inquiries in the Sales Portal and Portal Access checkbox.
Click .
After this setting is enabled, admin users will see an tab in Portal Access. Sales Portal users will see a section for in the Message Center.