Nodes
In Varicent Incentive Compensation Management (ICM), in addition to swimlanes, a workflow in Workflows also contains a series of nodes. Each node represents a step in the workflow that notifies payees, requires payees to take action, or requires the system to run an action.
There are several types of nodes.
- Start node
This node is added by default when a workflow is created and defines the beginning of the workflow.
- End node
This node is added by default when a workflow is created and defines the end point of the workflow.
- Alert node
Use this node to send customizable notifications to users by email or through web messages that are delivered to the Sales Portal. You can use this type of node to notify specific users or groups of users when a workflow requires their input or action to proceed.
- Action node
This node defines the path that the workflow takes, based on an action that is taken by a user. Each action node contains action paths that are associated with a Presenter report and different routes in the workflow. For example, if a user has the choice to either approve or cancel a report, the action node defines a different workflow path that is followed based on which option the user selects.
- Process node
This node runs a saved Scheduler process. The scheduled process runs only when the Scheduler is refreshed. By default, Scheduler refreshes every hour. The Scheduler user must not be logged into the client at the same time.
- Conditional node
This node routes users to different paths in the workflow, depending on defined conditions.
After the nodes for the workflow are created in the appropriate swimlanes, you can then connect them to create the workflow process.
Adding alert nodes
You can use an Alert node to notify payees or groups of payees through the Varicent Incentive Compensation Management (ICM) Sales Portal or by email when a Presenter report requires their input as part of a workflow. You can also configure an Alert node to send emails to users who are not involved in the workflow.
In Workflows, open the workflow.
Place your cursor over the column in the swimlane that you want to add the alert node to, and click Create new node.
Select Alert Node.
Type a name and description for the node and click Save.
From the Select message type drop-down list, choose one of the following options:
Message type
Description
Internal Message
Select to send a web message to the payees through the Sales Portal.
Specified Email
Select to send a message to specified email addresses only.
Internal Message and Email Notification
Select to send a web message to the payees through the Sales Portal and external email addresses that are specified in the Payee table.
In the Email subject field, type the subject for the message.
If you are sending an email, type the email address of the payee in the To and BCC fields.
In the Body field, type the message.
You can insert the following variables into the message:
Variable
Description
Form Initiator
Adds the name of the payee who is specified by the Form Initiator swimlane.
Recipient Name
Adds the name of the payee who receives the message.
Report Name
Adds the name of the Presenter report that is specified by the workflow.
Report Name with Link
Adds the name of the report and links to the Presenter report on the Sales Portal. This variable is available only when a message is sent through the Sales Portal and requires configuration of the Base URL in the Administrative Options window.
Tip
It is helpful to add the
Report Name with Linkvariable to the web message so that web users can quickly find the report.Click Done.
Configuring the Report Name with Link variable in an Alert node
In an Alert node in a workflow, it is helpful to add the Report Name with Link variable to web messages that are sent through the Varicent Incentive Compensation Management (ICM) Sales Portal, so that web users can quickly find the report. You must configure the Report Name with Link variable settings.
Click →
Click the Web tab.
In the Base URL field, type the URL of your WAR file.
For example, type the following address:
http://localhost:8080/Varicent ICM, whereVaricent ICMis the name of your WAR file.Click Save.
Adding action nodes
In Varicent Incentive Compensation Management (ICM), you can use an Action node to define operations that can be performed on a report in a particular step of the workflow in Workflows.
In Workflows, open the workflow.
Place your cursor over the column in the swimlane that you want to add the action node to, and click Create new node.
Select Action Node.
Type a name and description for the node and click Save.
To define the action paths for the web users, complete the following steps:
Click Add a new action.
Place your cursor over the new action, click the Edit icon, and type a name for the action path.
Select the Submit when selected checkbox to send the report to the next step in the workflow and submit the data when the action is performed in the Sales Portal.
Select the Required by all checkbox if all initiated workflows that are defined by the proceeding swimlane must reach the Action node before the action path is visible.
Select the Submit by all checkbox if all payees in the swimlane must perform the action before the workflow can move on.
This option can be selected for only one action and it cannot be combined with the Required by all selection.
On the Expiry tab, add an expiration date that can trigger the workflow to advance if no action has been taken by the specified date.
From the Expiry Type drop-down list, you can choose an expiration date or length of time before the Action node expires.
Set the date or the number of days and hours for the expiration of the Action node.
From the Expiration Path drop-down list, select the path that the workflow must take if the Action node expires.
On the Layout restrictions tab, you can perform the following actions:
In the Visible column, clear the checkboxes next to the layout tables that you do not want to be visible to payees on the Sales Portal.
In the Editable column, clear the checkboxes next to the layout tables that you do not want to be editable by users on the Sales Portal.
Important
The only fields that are editable in the report are the fields that were marked as editable in the data grids in Presenter. If you do not select the Editable checkbox on the Layout restrictions tab, the fields are not displayed as an editable part of the workflow, regardless of the Presenter settings.
Click Create.
Adding process nodes
In Varicent Incentive Compensation Management (ICM), you can use a Process node to add a process that was created in the Scheduler module to a workflow.
In Workflows, open the workflow.
Place your cursor over the column in the swimlane that you want to add the process node to, and click Create new node.
Select Process Node.
Type a name and description for the node and click Save.
Select the Scheduler process folder that you want the node to run.
Click Create.
If an error occurs when the defined process runs, the workflow either stops and enters an error state, or continues to run. The result depends on the configuration of the Stop Process on Error option in Scheduler.
Adding conditional nodes
In Varicent Incentive Compensation Management (ICM), you can use a Conditional node to define conditions that must be met in a particular step of a workflow.
Conditional nodes must have two exit paths. You can configure conditions with the following variables: parameters, editable value columns, stored values, and dates. You can create a maximum of five conditions in each Conditional node. To use the IF function with text values, you must have text values or text parameters defined in your associated Presenter report and disable the Enforce best practices for formulas option.
In Workflows, open the workflow.
Place your cursor over the column in the swimlane that you want to add the conditional node to, and click Create new node.
Select Conditional Node.
Type a name and description for the node and click Save.
Click Add a conditional path.
Click the Edit icon and type a name and description for the path.
Drag the available parameters into the window to create the formula for the condition.
Click Save.
When you are finished defining conditions, click Done.
Editing nodes
In Varicent Incentive Compensation Management (ICM), you can edit most nodes in a workflow in Workflows.
You cannot change the node type after the node is created. You cannot change or delete Start and End nodes.
In Workflows, open the workflow.
Place your cursor over the node that you want to edit and click the Edit icon.
Cutting, copying, and pasting nodes
In Workflows, you can copy and paste nodes into different columns in the same workflow or to columns in a different workflow.
In Workflows, open the workflow.
Place your cursor over the node that you want to move, click the ellipsis and select Cut or Copy.
Or select the node you want to move and then click the Cut
 or Copy
 icon from the floating toolbar.
Or select the node you want to move and then use the keyboard shortcuts for CutCtrl + X or CopyCtrl + C.
Place your cursor over an empty column in the same workflow or a different workflow, click the ellipsis and select Paste.
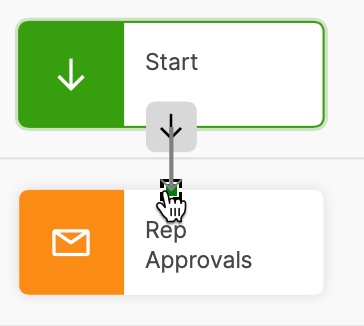
Connecting nodes
After you create nodes, you must connect them to define the workflow process in Workflows.
In Workflows, open the workflow.
To connect the Start node to the first node of the process, click the Start node and drag the arrow to the node that you want to connect to.
Or select the first node of the process and then click the icon
 from the floating toolbar to automatically connect that node to the Start node.
Connect the rest of the nodes to the workflow process by dragging the arrows from one node to another.
For each Action node with multiple action paths, complete these steps:
Click the Action node and drag the arrow to one of the nodes that you want to connect to.
Select the action path that you want to connect to the node, and click Save.
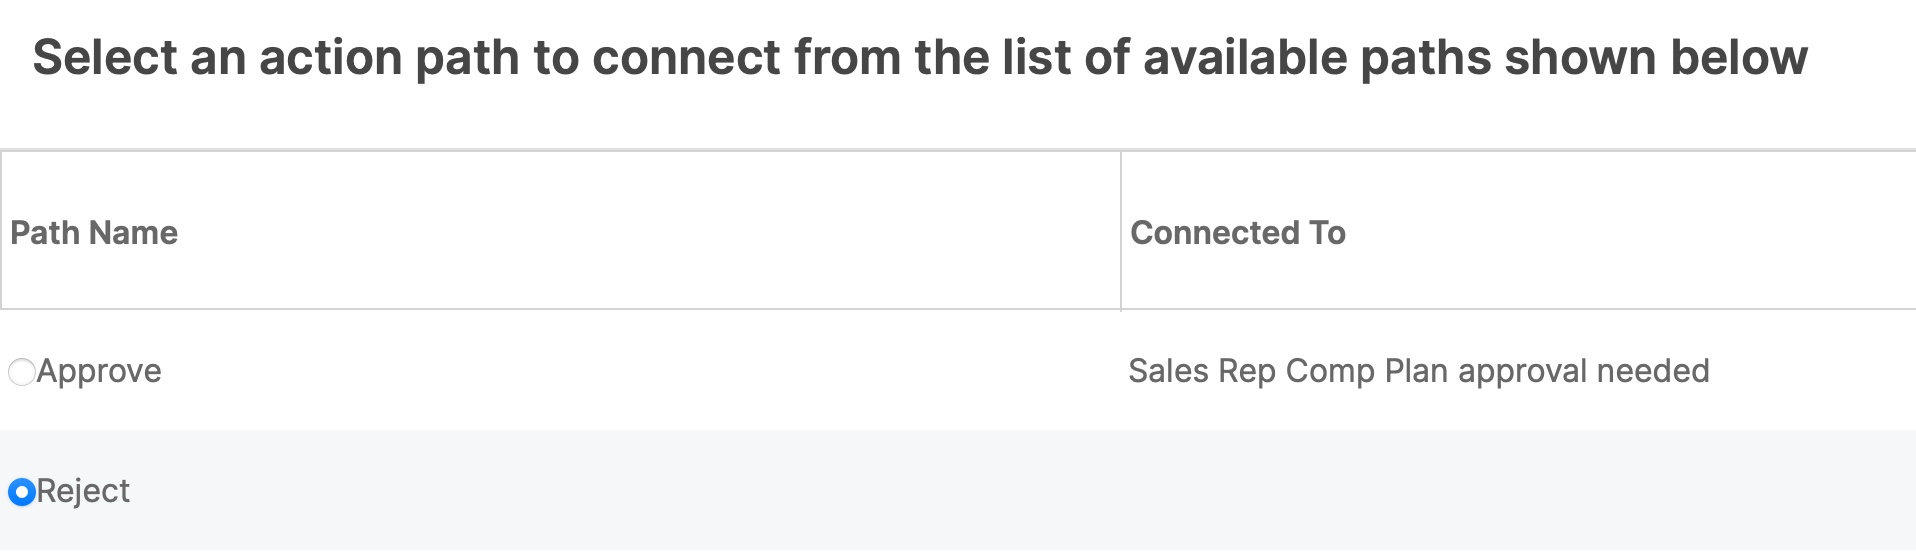
Repeat steps a and b to connect the other action paths to the appropriate nodes.
Connect the last node in the workflow process to the End node to complete the workflow.
You can specify whether the last node results in the workflow being approved or rejected.
Or select the last node of the process and then click the icon
 from the floating toolbar to automatically connect that node to the End node.