Workflows
Use Workflows to create workflows. Workflows are made up of steps that push a Presenter report from one state into another based on rules you define.
When you create a workflow, you associate it with a Presenter report. Within a workflow, you can add any number of nodes. A path is created between those nodes that defines the logical flow of the business process.
You can create three types of workflows in Workflows.
- Admin-initiated workflow
In an admin-initiated workflow, web users can submit data only one time per cycle of the workflow. If users must submit data again, the admin must restart the workflow.
This type of workflow is ideal for data submission that occurs during a specific time, like an MBO self-scoring form where a user submits scores once a quarter. This type of workflow also works well for situations where the user's submission must be approved by a manager before it can be accepted.
- User-initiated workflow
In a user-initiated workflow, web users can submit data an unlimited number of times as long as the workflow is active.
This type of workflow is ideal for data submission that occurs frequently over a long period of time, like an expense report.
- Inquiry workflow
An inquiry workflow is a special type of workflow you can use to define unique rules for routing inquiries throughout your organization.
By default, inquiry trees are assigned based on user groups. When a user makes an inquiry, that inquiry goes to another group. This is usually based on a reporting relationship. With an inquiry workflow, you can use conditional routing to have more control over the inquiry process. For example, you can route inquiries to go to a different group or a specific user depending on the inquiry category.
Adding a workflow
In Varicent Incentive Compensation Management (ICM), the first step to creating a business process is to create an admin-initiated or user-initiated workflow in Workflows.
In Workflows, click Create workflow and then select one of these workflow types:
Type
Description
User-initiated workflow
In this workflow, web users can submit data an unlimited number of times as long as the workflow is active.
Admin-initiated workflow
In this workflow, web users can submit data only once per each cycle of the workflow. If you want users to submit data again, you must restart the workflow.
Inquiry workflow
This is a special type of workflow that you can use to define the rules for how inquiries are routed. For more information about this type of workflow, read: Inquiry Workflows.
Click the Edit icon next to the Add a workflow name heading to type a name and description for the workflow.
On the Choose Report tab, complete the following steps:
Select the Presenter report to associate with the workflow.
To use the Presenter report's default value for a parameter, leave the Use report default value checkbox selected.
To select or enter a different value for a parameter, clear the Use report default value checkbox, and complete one of the following steps:
To select the web user or form initiator for a parameter, select Value from the menu next to the parameter, and then select the value from the next menu.
To specify a constant value for a parameter, select Constant from the menu next to the parameter, and then type the constant value in the field.
If you selected a user-initiated workflow, on the Layout Restrictions tab, complete the following steps:
Clear the Visible checkbox next to any layout tables that you do not want to display on the Presenter report.
Clear the Editable checkbox next to any layout tables that you do not want to be editable in the Presenter report.
On the Type tab, select one of the following choices:
Type
Description
Explicity select payees
You can choose the payees that are part of the form initiator swimlane.
Select payees by restrictions
You can set restrictions to define the payees that are part of the form initiator swimlane.
On the Data Sources tab, add any additional Data sources that are required to define the payee or payee group that makes up the first swimlane. You can use any table or calculation with a payee partition as a source.
On the Restrictions tab, define the Restrictions for the payee or payees who make up the form initiator swimlane.
If you are not defining payees by restriction, on the Payees tab, select or clear the column to add or remove payees from the form initiator swimlane.
Click Create.
Editing a workflow
In Varicent ICM, you can make changes to an existing workflow in Workflows.
To change the form initiator, you must edit the Form Initiator swimlane. If the workflow is in progress, you can open the Workflows wizard, but you cannot make any changes.
In Workflows, click the workflow that you want to edit.
Make your changes.
Copying a workflow
In Varicent ICM, you can copy a workflow in Workflows.
When you duplicate a workflow instance, the process duplicates the configuration of the workflow, such as the workflow type and the linked Presenter report, along with the swimlanes and nodes. The process does not duplicate the workflow state, such as errors, pending actions, or history, of any running workflows. You can duplicate a running workflow, but a duplicated workflow is initially in a stopped state.
In Workflows, from the row with the workflow that you want to copy, click the more options menu (...).
Select Duplicate.
Type a name for the new workflow.
Click Save.
Setting default parameters for a workflow
In Workflows, if a group of payees is assigned to the form initiator swimlane, you can select one payee to be the default form initiator in Workflows. Default parameters are useful when you create additional swimlanes, because you can preview the selected payees who are defined by a restriction by using the form initiator.
Open the workflow you want to set the default parameter for.
Click the Workflows icon
 to open the Workflow Settings menu.
Under the Swimlanes tab, select the name of the form initiator you want to use as the default when previewing.
Starting a workflow
In Varicent Incentive Compensation Management (ICM), an administrator must initiate workflows in Workflows.
In Workflows, open the workflow.
In the toolbar, click the Start icon.
Note
When a workflow is in progress, the Stop icon next to the workflow name in the left panel becomes a Start icon.

Adding payees after a workflow is started
Once a workflow is active, you can still add payees to swimlanes.
If the workflow is not already active, in Workflows, start the workflow.
In the toolbar, click the Add workflow payees icon
 .
.If you used restrictions to define payees, click Yes in the window that opens.
Important
If you used restrictions to define payees, you can schedule the addition of workflow payees in the Scheduler module.
If you selected Explicit User to define swimlane payees, in the Add Workflow Payees wizard, add any sources to define the additional workflow payees.
Create the restrictions to define the additional payees who you want to add to the workflow.
Select the payees who you want to add to the workflow.
Adding admins after a workflow is started
Once a workflow is active, you can still add admin users to admin swimlanes.
In the Workflows module, open the workflow you want to modify.
Hover over the admin swimlane. Select the edit icon
 to edit the swimlane.
An editor will open. Select Admins in the editor.
Use the checkboxes to select or deselect the admins for the swimlane.
Select create to save your changes and close the editor.
Organizing workflows
To organize your workflows In Varicent ICM, you can rearrange and nest/unnest folders and workflows with an easy and intuitive drag-and-drop interface. Just click and drag workflows to put them inside of folders in the left-side menu. Click and drag folders over/under each other to rearrange them. Drag and drop one folder on top of another to nest within that folder. To un-nest a folder, click and drag it to the left.
To nest a folder, you can also:
Click the More options button of the folder you want to nest.
Click Move to folder.
Select the folder you want to nest within.
Click Move.
Note
When you are moving folders, they will collapse automatically. If you drag your folder outside of the menu and drop, it will return to its original place in the list.
For ease and accessibility, this feature also works with keystrokes! Click or tab into the Folders sidebar to start navigating with arrows. Press up and down keys to toggle between folders. Press enter/return to expand and collapse folders. Press the space bar to start dragging a selected folder. Press the space bar again to drop the folder.
To create a nested folder/subfolder:
Select the folder that you want nest inside of.
Click the More options button.
Click Add folder.
To rename a folder:
Select the folder you want to rename.
Click the More options button.
Click Rename.
Enter a name for the folder.
Press Enter/Return.
Data sources
In Varicent ICM, data sources are any calculation, table, or data store that can be used to create another data source or to display results in reports and web forms.
Initially, any non-system table is available as a calculation source. After you create one or more calculations, you can select any other calculation result as a source for a new calculation.
Adding a Data Source
In Varicent ICM, you must add a data source when creating calculations, data stores, Presenter components, workflows, and web form objects.
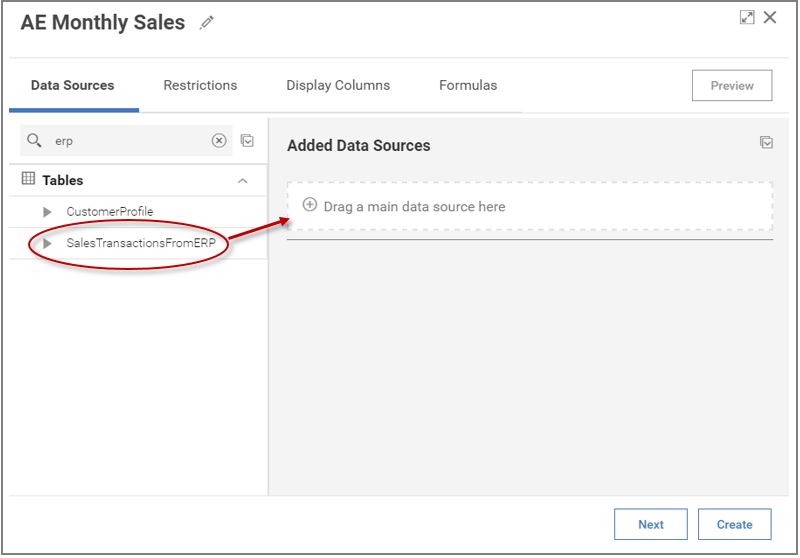
Create an object that requires data sources.
On the Data Sources tab, drag your main data source and place it in the Added Data Sources field.
If adding one data source does not give you the results you need, you can join multiple data sources instead.
Multiple sources
Multiple Sources
In Varicent ICM, data from multiple sources can be combined by adding columns or adding rows.
For example, one table might contain all of the sales data that is required to calculate total sales, and another might contain quotas and compensation rates that must be applied. Multiple sources are required for this calculation.
The model administrator can add multiple additional sources to the current source.
Important
Adding columns produces the same result as creating a View in the Composer module. However, Views cannot be used as sources in calculations.
Add sources by columns
In Varicent ICM, you can join two or more tables or calculations together to define the data sources for your calculation by adding columns. This is referred to as a join.
Joining data sources by adding columns is typically used when the data from two or more sources will be compared against each other, or used in a formula.
Normally, you join data sources together based on a point of commonality by defining restrictions for the join. By default, columns with the same name and of the same type are joined automatically. You can choose to disable the automatic creation of joins.
For example, consider a situation where you join a product table to a payee table to display the products that were sold by each payee. If you restrict, or join, your results based on the payee ID, you can get the results shown in the following tables.
PayeeID | Name |
|---|---|
001 | John Smith |
002 | Sue Jacobs |
003 | Marc Frederick |
004 | Mary Scott |
ProductID | ProductName | PayeeID |
|---|---|---|
123 | Printer | 001 |
234 | Cable | 001 |
345 | Monitor | 003 |
PayeeID | Name | ProductID | ProductName |
|---|---|---|---|
001 | John Smith | 123 | Printer |
001 | John Smith | 234 | Cable |
003 | Marc Frederick | 345 | Monitor |
Important
No data is displayed for Sue Jacob (002) or Mary Scott (004) because there are no corresponding rows in the Product table for those payees.
You can use restrictions to join each new source to an existing source based on a point of commonality. For example, if the initial source contains transactional data for each payee, and the second source contains compensation rates to be applied to sales, you must specify how to associate the two types of payee data. If the compensation rates vary based on job title, and Title ID is contained in both tables, they can be joined on that basis, for example, ERP.TitleID = Rates.TitleID.
Adding restrictions is an important part of adding a data source. If you do not create restrictions, each row in the new source is added to each row in the existing source. This action creates many more rows than either source would have individually.
For example, if the first source had 100 rows and the second had 50 rows, the result of a join with no matches would be 100 x 50 = 5000 rows, or a row for each possible combination of rows in the two sources.
While restrictions are normally necessary, there might occasionally be instances where you want to display all the possible row combinations when you join two sources. Imagine that you have a product table and a payee table, and you want a table that shows each product that might potentially be sold by each payee.
PayeeID | Name |
|---|---|
001 | John Smith |
002 | Sue Jacob |
003 | Marc Frederick |
004 | Mary Scott |
ProductID | ProductName | PayeeID |
|---|---|---|
123 | Printer | 001 |
234 | Cable | 001 |
345 | Monitor | 003 |
Imagine that you complete the following steps:
Define the payee table as your first source.
Add columns to the payee table from the product table.
Decline to add restrictions.
Your join produces the results in the following table.
PayeeID | Name | ProductID | ProductName |
|---|---|---|---|
001 | John Smith | 123 | Printer |
001 | John Smith | 234 | Cable |
001 | John Smith | 345 | Monitor |
002 | Sue Jacob | 123 | Printer |
002 | Sue Jacob | 234 | Cable |
002 | Sue Jacob | 345 | Monitor |
003 | Marc Frederick | 123 | Printer |
003 | Marc Frederick | 234 | Cable |
003 | Marc Frederick | 345 | Monitor |
004 | Mary Scott | 123 | Printer |
004 | Mary Scott | 234 | Cable |
004 | Mary Scott | 345 | Monitor |
Important
This example represents an unrestricted join, where every row on the first table is matched to every row on the second table. It is import to carefully define joins to make sure that your information is returned as intended.
Adding additional sources by columns
In Varicent ICM, you can join two or more data sources together by columns to compare the data sources or use the data in a formula.
On the Data Sources tab, drag the first source and place it in the Added Data Sources pane.
Drag the second source and place it in the field below the first source.
To add additional sources, drag the source that you want to add and place it above or below a source in the Added Data Sources pane.
Define restrictions for the join.
Add sources by rows
In Varicent ICM, you can create a union between data sources by adding data from one source to the bottom of another source. This creates one data source.
You might find that joining sources (adding columns) does not organize your data in a way that creates the results that you want. If so, you can append sources by adding rows. This feature is similar to adding columns in that both options are used to relate information from multiple sources.
Consider a plan that pays compensation to employees based on their total sales minus any returns that are made by month. Look at the information for employee 001.
Employee | Total Sales | Date |
|---|---|---|
001 | 1500 | Month 1 |
001 | 250 | Month 1 |
001 | 700 | Month 2 |
001 | 500 | Month 3 |
Employee | Returns | Date |
|---|---|---|
001 | -100 | Month 1 |
001 | -50 | Month 2 |
If you follow these steps to add rows from the return data table to the sales data table, the results match the Results of adding rows table.
Add rows from the return data table to the sales data table.
Look for a sum of the total sales.
Partition the results by months.
Total Sales | Months |
|---|---|
1650 | Month 1 |
650 | Month 2 |
500 | Month 3 |
A result is shown for Month 3, even though there is no record for that month in the return data table. If you link these tables by adding columns, the row containing March would not be displayed.
All columns in the source table must be mapped to a column in the union table. For this reason, the columns in the source table must be similar to the columns in the union table. For example, both the Sales data table and the Return data table had employee ID, amount, and date columns.
Adding additional data sources by rows
In Varicent ICM, join two or more data sources together by rows to create one source.
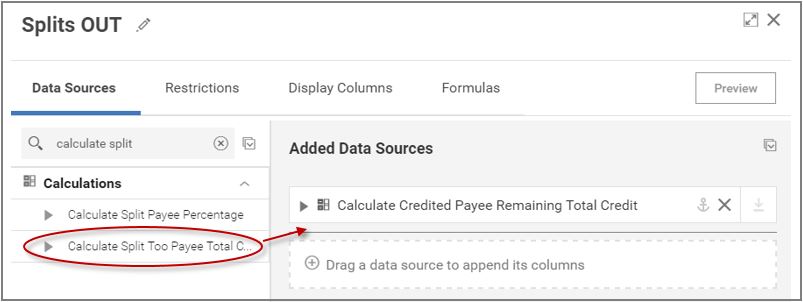
On the Data Sources tab, drag the first source and place it in the Added Data Sources pane.
Drag the second source and place it over the source in the Added Data Sources pane.
Make sure all the columns are mapped.
Tip
Click Automatch to have the application map identical column names automatically.
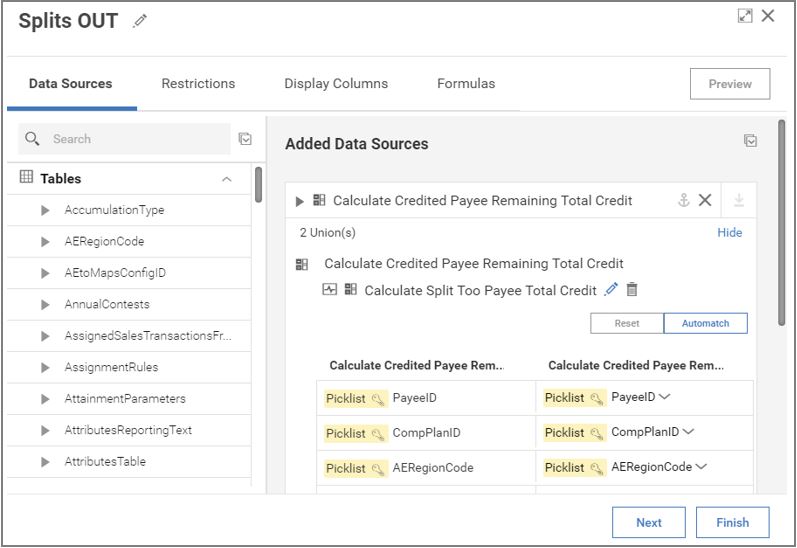
Click the Edit icon next to the second source to view the column mapping section.
Anchor feature
In Varicent ICM, use the Anchor feature when joining sources in data stores, calculations, and Presenter report data sources.
Enabling the Anchor feature  allows you to display rows for all records for the first data source even if the join does not find matching records in the second data source. Only matched records from the second data source are returned. If the second data source returns one row and the first data source returns more than one matching row for it, the values in the second source are repeated for each distinct row in the first data source.
Consider a situation where you have the following two data sources:
Name | DepartmentID |
|---|---|
Dan Huddell | 004 |
Brain Acton | 001 |
Jill Avery | 002 |
John March | 003 |
Chris Ackles |
DepartmentID | Department Name |
|---|---|
001 | Sales |
002 | Development |
003 | Services |
004 | Marketing |
005 | Training |
If you preview from Data Sources tab when the Anchor feature is used, records from the first data source are returned even when there is no matching record in the second source.
Name | DepartmentID | Department Name |
|---|---|---|
Dan Huddell | 004 | Marketing |
Brain Acton | 001 | Sales |
Jill Avery | 002 | Development |
John March | 003 | Services |
Chris Ackles |
When you partition an anchored source in calculations, any partitions that have null results are removed. When you preview from the Formulas tab with Name, Department ID, and Department Name as partitions, Chris Ackles is removed from the data set. However, if you partition by Name only, Chris Ackles is included.
Restrictions
In Varicent Incentive Compensation Management (ICM), you can use restrictions to exclude certain records from data sources.
For example, you might not want your calculation results to include every record in the source data table or all of the results from a prior calculation. By defining a restriction, you can limit the records included in the calculation by specifying conditions for their selection. To define the records that are included in your calculated results, you might impose restrictions on sales that include product 2 or transactions that exceed $50,000 and are sold to a customer in New York.
For each restriction, you must define a data source, an operator, and a value to determine whether the restriction must be applied. The following operators are available:
= (equals)
<> (does not equal)
< (is less than)
> (is greater than)
<= (is less than or equal to)
>= (is greater than or equal to)
is empty
is not empty
Restrictions can be defined based on both individual values and sources. For example:
Value: PayeeID = 1234
Source: Payee ID in source 1 = Payee ID in source 2
Restrictions can be added to the main source but can only be constant values, such as Data.Value=10. Main source restrictions cannot involve any attribute from other tables.
Defining restrictions for joined sources
In Varicent ICM, you can define restrictions to join sources based on a point of commonality.
Restrictions for data sources are defined on the Restrictions tab. All sources and restrictions are displayed. By default, restrictions between sources are created automatically. Any text, date, email, or pick list columns that have the same name and column type in the two sources are joined. You can choose to disable the automatic creation of joins.
On the Restrictions tab, expand the source for which you want to define restrictions.
Hover your mouse over the area next to AND and click Restriction.
Tip
If you need to create many restrictions at once, it is faster to click Restriction multiple times and then drag the columns into the empty fields. For example, if you know you need to create five restrictions, click Restriction five times in a row.
Drag the column from the source that you want to restrict and place it in the first field.
Select an operator for the restriction from the drop-down list.
Drag a column from the joined source to the second restriction field to define the restriction.
Defining global restrictions
In Varicent ICM, you can identify the data that should be included in your final result. For example, you can restrict a calculation to show only the sales of a specific product for each month.
A Global Restrictions dynamic panel is displayed at the bottom of the Restrictions tab. You can define the restrictions in this pane that are global and would be applied after all other restrictions in the normal pane or for filters related to anchoring the base data source.
On the Restrictions tab, expand the Global Restriction pane.
Hover your mouse over the area next to AND and click Restriction.
Drag a column on which you want to restrict from the data source to the first field on the Global Restriction pane.
For example, drag the ProductID column to the Product table source.
Select an operator from the drop-down list.
For example, select the equal operator.
In the second field of the restriction, perform one of the following actions:
To select a value from the selected column to define the restriction, click in the second restriction field and select the value.
Drag a column on which you want to restrict from the data source to the first field on the Global Restriction pane.
Multiple restrictions that use AND or OR groups
In Varicent ICM, if you need to get two sets of results in one object, you can use OR within AND restrictions.
For example, you can show all data that is either Product ID 001 and Payee ID Huddle or all data that is Payee ID 001 and Payee ID Young.
- AND Groups
When multiple restrictions are defined, they are separated with an
ANDoperator by default. For example, if you define the following restrictions, you get results for payee 1234 in January:Payee ID = 1234
Month = January
- OR Groups
You can use
ORgroups to define the following type of restriction: Payee ID = 1234 or Payee ID = 3456.
Adding AND or OR groups in restrictions
In Varicent Incentive Compensation Management (ICM), you can define multiple restrictions for your results by adding AND or OR groups.
On the Restrictions tab, expand the data source that you want to create an AND or OR group for.
Hover your mouse over the area next to AND, and select one of the following options:
Option
Description
AND group
Both or all defined restrictions in the group are applied to the data.
OR group
Data where any restrictions in the group are true is retrieved.
Define the restrictions.