Data Imports
In Varicent Incentive Compensation Management (ICM), you can import data into any hierarchy, system, data, custom, or structural table from a file or third party application.
Data can be imported from your computer or from Varicent ICM on cloud storage. Files that are imported from your computer with the Save this import as checkbox selected are saved to Varicent ICM on cloud storage. You can also use the CLI import tool to save import files to Varicent ICM on cloud storage.
Importing Data From Text Files
In Varicent Incentive Compensation Management (ICM), you can import data into tables from text files.
From the Composer module, find the table that you want to import data into.
Click Import.
Select one of the following import types:
Import type
Description
Import data from external source
Select this option if your import file is located on your computer.
Import data from SPM storage
Select this option to import a file that is stored on Varicent ICM cloud or from another application, such as Salesforce.com.
Select Text File and click Next.
Click Browse and select the file that you want to import.
Note
Click Preview to see a preview of the file.
Select the language of the file that you're importing.
The date and numeric format of the values in the imported file are based on the language selected.
Select the The first record is a header checkbox if the first row of your text file contains labels for each column.
This indicates that the first row should not be processed as data, as it is a label for each column.
Select the delimiter from the Delimiter drop-down list.
When importing from a text file, you can choose a special character to import fields that contain a delimiter. You can choose from the following five delimiters: comma, period, pipe (|), semicolon, and tab. This is useful if you have data that contains a comma but is importing from a comma delimited file. Without some sort of special character, there would be no way to import a field containing a comma from that kind of file.
To save the import to Varicent ICM storage, select the Save this import as check box and name the import.
Saving the import allows you to run the import at a later time using Scheduler. If this option is not selected, the file is not saved to Varicent ICM storage. See the Scheduler Module section for more information on using the Scheduler.
Click Next.
Map the columns in the target table, listed under Columns, to the Data fields in the imported file data set.
Select any or all of following options available within the wizard:
Option
Description
Date format
Selects the date format of the file you're importing.
Reset
Resets all selections.
Automatch
Matches identical column names automatically.
Click Next.
Select any or all of the following run options:
Option
Description
Update existing rows
Indicates that existing rows of data should be updated with data contained in the imported rows.
Run this import now
Indicates that the import should be run immediately. Clear this checkbox if you want to save the current import and process it at a later date.
Use incremental import
Indicates that rows should be imported into the database in smaller batches instead of committing the entire import in one batch. Use this option to process database calls, such as report generation in the Sales Portal, during a large data import.
Click Done.
Importing Data From Excel Files
Varicent Incentive Compensation Management (ICM) lets you import data into tables from Excel files.
Tip
Looking for a way to edit your data in Excel and push it directly to Varicent ICM? Try the Varicent add-in for Excel.
From the Composer module, find the table that you want to import data into.
Click Import.
Select one of the following import types:
Import type
Description
Import data from external source
Select this option if your import file is located on your computer.
Note
The Excel file can be no larger than 2MB. To import Excel files larger than 2MB, use the CLI import tool.
Import data from SPM storage
Select this option to import a file that is stored on Varicent ICM cloud or from another application, such as Salesforce.com.
Select Microsoft Excel and click Next.
Select the file to import and click Next.
Note
Click Preview to see a preview of the file.
Select the language of the file that you're importing.
The date and numeric format of the values in the imported file are based on the language selected.
If the first row of your Excel file contains labels for each column, select the The first record is a header checkbox.
Select the worksheet you want to import.
To save the import to Varicent ICM storage, select the Save this import as check box and name the import.
Saving the import allows you to run the import at a later time using Scheduler. If this option is not selected, the file is not saved to Varicent ICM storage. See the Scheduler Module section for more information on using Scheduler.
Click Next.
Map the columns in the target table, listed under Columns, to the Data fields in the imported file data set.
Select any or all of following options available within the wizard:
Option
Description
Date format
Selects the date format of the file you're importing.
Reset
Resets all selections.
Automatch
Matches identical column names automatically.
Click Next.
Select any or all of the following run options:
Option
Description
Update existing rows
Indicates that existing rows of data should be updated with data contained in the imported rows.
Run this import now
Indicates that the import should be run immediately. Clear this checkbox if you want to save the current import and process it at a later date.
Use incremental import
Indicates that rows should be imported into the database in smaller batches instead of committing the entire import in one batch. Use this option to process database calls, such as report generation in the Sales Portal, during a large data import.
Click Done.
Importing Data From XML Files
Varicent Incentive Compensation Management (ICM) allows you to import data stored in XML format directly into tables.
From the Composer module, find the table that you want to import data into.
Click Import.
Select one of the following import types:
Import type
Description
Import data from external source
Select this option if your import file is located on your computer.
Import data from SPM storage
Select this option to duplicate a file that has already been imported or from another application, such as Salesforce.com.
Select XML File and click Next.
Click Browse to select the file to import.
Note
Click Preview to see a preview of the file.
Select the language of the file that you're importing.
The date and numeric format of the values in the imported file are based on the language selected.
Select the row node to import data from.
To save the import to Varicent ICM storage, select the Save this import as check box and name the import.
Saving the import allows you to run the import at a later time using Scheduler. If this option is not selected, the file is not saved to Varicent ICM storage.
Click Next.
Map the columns in the target table, listed under Columns, to the Data fields in the imported file data set.
Select any or all of following options available within the wizard:
Option
Description
Date format
Selects the date format of the file you're importing.
Reset
Resets all selections.
Automatch
Matches identical column names automatically.
Click Next.
Select any or all of the following run options:
Option
Description
Update existing rows
Indicates that existing rows of data should be updated with data contained in the imported rows.
Run this import now
Indicates that the import should be run immediately. Clear this checkbox if you want to save the current import and process it at a later date.
Use incremental import
Indicates that rows should be imported into the database in smaller batches instead of committing the entire import in one batch. Use this option to process database calls, such as report generation in the Sales Portal, during a large data import.
Click Done.
Importing Data From Database Files
In Varicent Incentive Compensation Management (ICM), you can import data into tables from database files.
From the Composer module, find the table that you want to import data into.
Click Import.
Select Import data from SPM storage.
Select Database Import and click Next.
To use a Text Driver, select the Use Microsoft Text Driver checkbox and select a file to import.
Note
Click Preview to see a preview of the first 1,000 rows of your selected data.
Click Configure.
Type a SQL statement.
Note
When using SQL to convert strings to numbers, do not use the
floatordoubletype as they are not precise representations of numbers. Use thedecimaltype.Select a model, import method, and query timeout.
If the first row of your file contains labels for each column, select the The first record is a header checkbox.
Select the Save this import as checkbox to save the import.
Saving the import allows you to run the import at a later time using Scheduler. If this option is not selected, the file is not saved to Varicent ICM storage.
Click Next.
Map the columns in the target table, listed under Columns, to the Data fields in the imported file data set.
Select any or all of following options available within the wizard:
Option
Description
Date format
Selects the date format of the file you're importing.
Reset
Resets all selections.
Automatch
Matches identical column names automatically.
Click Next.
Select any or all of the following run options:
Option
Description
Update existing rows
Indicates that existing rows of data should be updated with data contained in the imported rows.
Run this import now
Indicates that the import should be run immediately. Clear this checkbox if you want to save the current import and process it at a later date.
Use incremental import
Indicates that rows should be imported into the database in smaller batches instead of committing the entire import in one batch. Use this option to process database calls, such as report generation in the Sales Portal, during a large data import.
Click Done.
Importing Data From Salesforce.com
In Varicent Incentive Compensation Management (ICM), you can import data from Salesforce.com into a table.
From the Composer module, find the table that you want to import data into.
Click Import.
Select Import data from SPM storage.
Select Salesforce.com and click Next.
Type your Salesforce.com username, password, and security token.
Select the table that you want to import.
The menu lists all of the Salesforce.com tables that you have access to.
Note
Click Preview to see a preview of the table before you run the import.
To save the import to Varicent ICM storage, select the Save this import as check box and name the import.
Saving the import allows you to run the import at a later time using Scheduler. If this option is not selected, the file is not saved to Varicent ICM storage. See the Scheduler Module section for more information on using the Scheduler.
Click Next.
Map the columns in the target table, listed under Columns, to the Data fields in the imported file data set.
Select any or all of following options available within the wizard:
Option
Description
Date format
Selects the date format of the file you're importing.
Reset
Resets all selections.
Automatch
Matches identical column names automatically.
Click Next.
Select any or all of these run options:
Run option
Description
Update existing rows
Selecting this option updates any existing rows of data with data that is contained in the imported rows.
Run this import now
Selecting this option runs the import immediately. If you want to save the current import and process it later, clear this checkbox.
Use incremental import
Selecting this option imports the table rows into the database in smaller batches instead of committing the entire import in one batch. Use this option to process database calls, such as report generation in the Sales Portal, during a large data import.
Click Done.
Importing Data From Symon.AI
Importing data into Varicent Incentive Compensation Management (ICM) directly from Symon.AI is useful if you want to transform your data in Symon before adding it to your Varicent ICM model. You can also save and schedule imports from Symon.
From the Composer module, find the table that you want to import data into.
Click Import.
Select Import data from SPM storage.
Select Symon and click .
Select the Symon pipe output from the drop-down menu and click .
If your source data is stored in Varicent ICM:
Under Advanced Options, ensure the Upload from source table toggle is turned on. Click .
In the Send data to pipe tab, select the table in Varicent ICM that contains the source data from the Load from source data drop-down list.
Match the columns in the data source (Data Source Columns) to the columns in the Symon pipe (Data Tool Columns). Click Next.
In the Map result to table tab, select the Symon export tool from the Symon export tool drop-down list.
Match the columns in the Symon pipe (Export Tool Columns) to the source you want to import into (Output Columns).
Tip
Click to automatically match columns with identical names.
If your source data is stored in Symon:
Under Advanced Options, turn off the Upload from source table toggle.
Turn on the Run pipe (transform your data) toggle. Click .
In the Map result to table tab, select the Symon export tool from the Symon export tool drop-down list.
Match the columns from the Symon pipe (Export Tool Columns) to the source you want to import into (Output columns).
Tip
Click to automatically match columns with identical names.
Click .
Select any or all of these run options:
Option
Description
Update existing rows
Updates any existing rows of data with data that's contained in the imported rows.
Run this import now
Runs the import immediately. If you want to save the current import and process it later, clear this checkbox.
Use incremental import
Imports the table rows into the database in smaller batches instead of committing the entire import in one batch. Use this option to process database calls, such as report generation in the Sales Portal, during a large data import.
Save this import as
Saves the import so you can run it at a later time using Scheduler. If this option is not selected, the file is not saved to Varicent ICM storage. See the Scheduler Module section for more information on using Scheduler.
Click .
Adding New Fields
In Varicent ICM, when importing data from a file, you can create new fields from existing columns. You can also create a subitem, which is segment of the data in an existing column.
From the Composer module, find the table that you want to import data into.
Click Import.
When mapping the import file columns to the table columns, from the Match a column drop-down list, select Create Field.
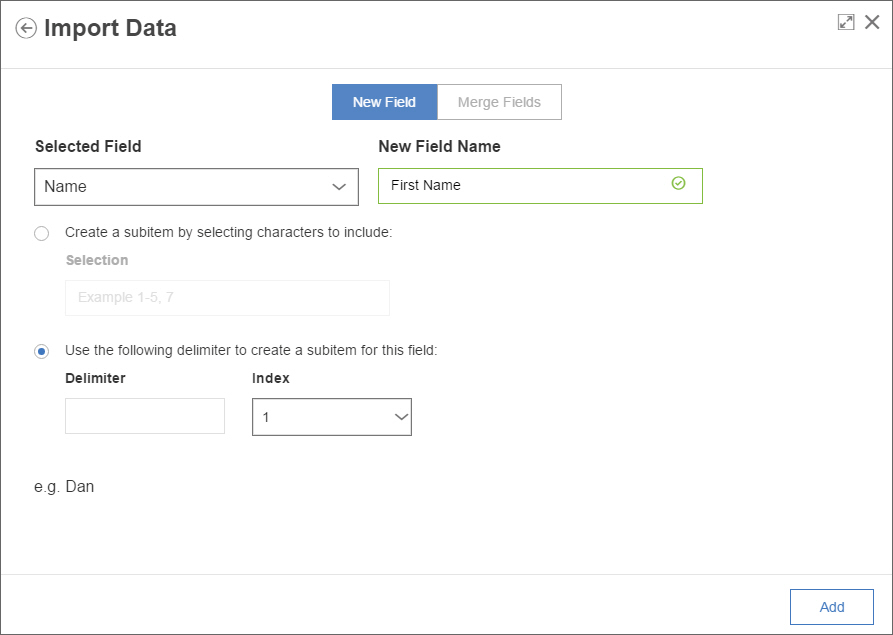
From the Selected Field drop-down list, select the column that you want to create subitems from.
In the New Field Name field, type a name for the subitem.
To add a subitem, select one of the following options:
Option
Description
Create a subitem by selecting characters to include
Select this option to type the number of characters in the field to include. For example, type 1-5 if you want to include the first five characters of the field.
Use the following delimiter to create a subitem for this field
Select this option to type a delimiter and select the index to create a subitem. For example, if you have a Name field that contains first and last names separated by a space (for example, Dan Huddle) and you want to add a First Name field, you would type a space as the delimiter and select an Index of 1 since the first name is the first item before the delimiter.
Tip
You can confirm if your selection is correct by looking at the example.
Click Add.
Merging Fields
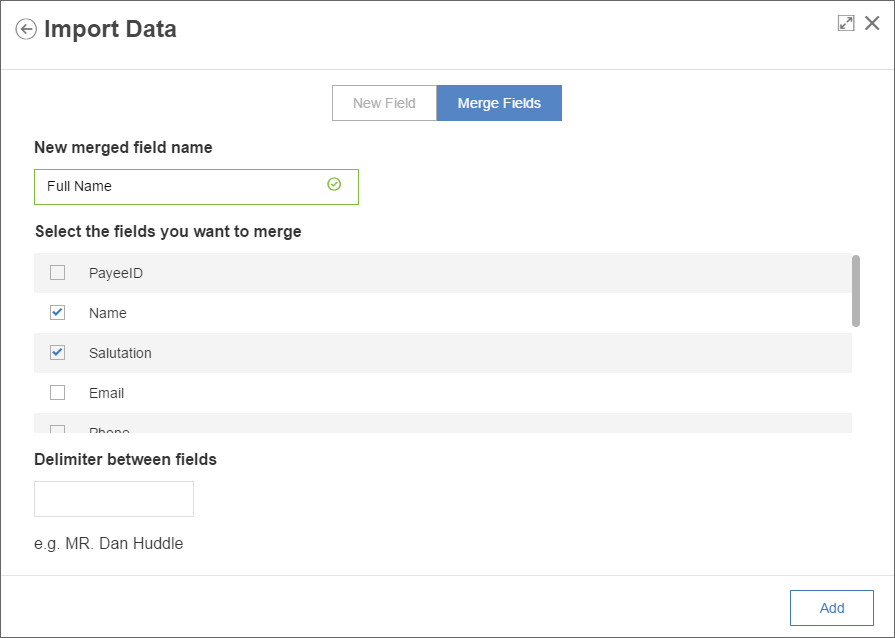
In Varicent Incentive Compensation Management (ICM), when you import data from a file, you can combine two columns in your data source into one column. For example, if you have a month and a year field, you can merge the two and create one date field.
From the Composer module, find the table that you want to import data into.
Click Import.
To map the import file columns to the table columns, from the Match a column list, select Create Field.
Click the Merge Fields tab.
Type a name for the new column.
Drag at least two data fields under Selected fields to merge them.
Type a delimiter. The delimiter is placed between the merged fields.
Tip
You can reorder the fields by dragging and dropping them under Selected fields.
Click Add.
Using effective dates in table imports
When you import data into tables with effective dates in Varicent Incentive Compensation Management (ICM), you must map the effective date columns to the appropriate date columns in the import.
Optionally, you can click Defaults to select a default effective start date and a default effective end date to use for all imported records.
The effective start date is a key column so it must be mapped to a date field in the import file or set to a default date. The values cannot be empty or null.
The effective end date is not a key column so it does not have to be mapped. If the effective end date is unmapped, imported records have a date of 12/31/9998.
Imported effective start and effective end values must follow the rules of effective dating. That is, the dates must be between 1/1/1753 and 12/31/9998 and the effective start date must be the same day or earlier than the effective end date. The import file cannot contain multiple records with matching keys and overlapping effective dates.
The effective start date and effective end date mapping can be modified when editing a saved import.
Editing EffectiveDate tables using TSAPI
Our TSAPI allows for the insertion and manipulation of EffectiveDate tables. All payees have the ability to edit EffectiveDate tables using the TSAPI, without the need to do so through web forms.
You can use POST/PATCH via TSAPI to do the following:
POST
Add new rows with or without effective end date
Add rows with effective start date ahead of the existing rows
Overwrite existing rows
PATCH
Update effective end date
Update non-key columns
Refreshing table data
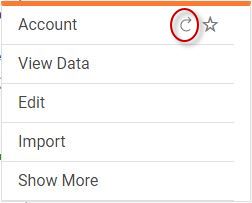
In Varicent Incentive Compensation Management (ICM), in Composer, you can refresh the table after importing data.
In Composer, click the table.
In the more options menu that displays on the right, click Refresh.
Troubleshooting data imports
If a data import is slow, you can try using an alternate import method to improve database imports.
Symptoms
Import is slow compared to a previous import of the same data.
Resolving the problem
You can use an alternate import method for database imports. This method can improve import times, but should only be used if an import is significantly slow.
When you run a database import, select as the import method.
Note
You cannot use this method if you want to use a text driver to import your data.
In Composer, click the table.
Click Import.
Select Import data from Varicent ICM storage.
Select Database Import and click Next.
From the Import Method menu, select Path 1.